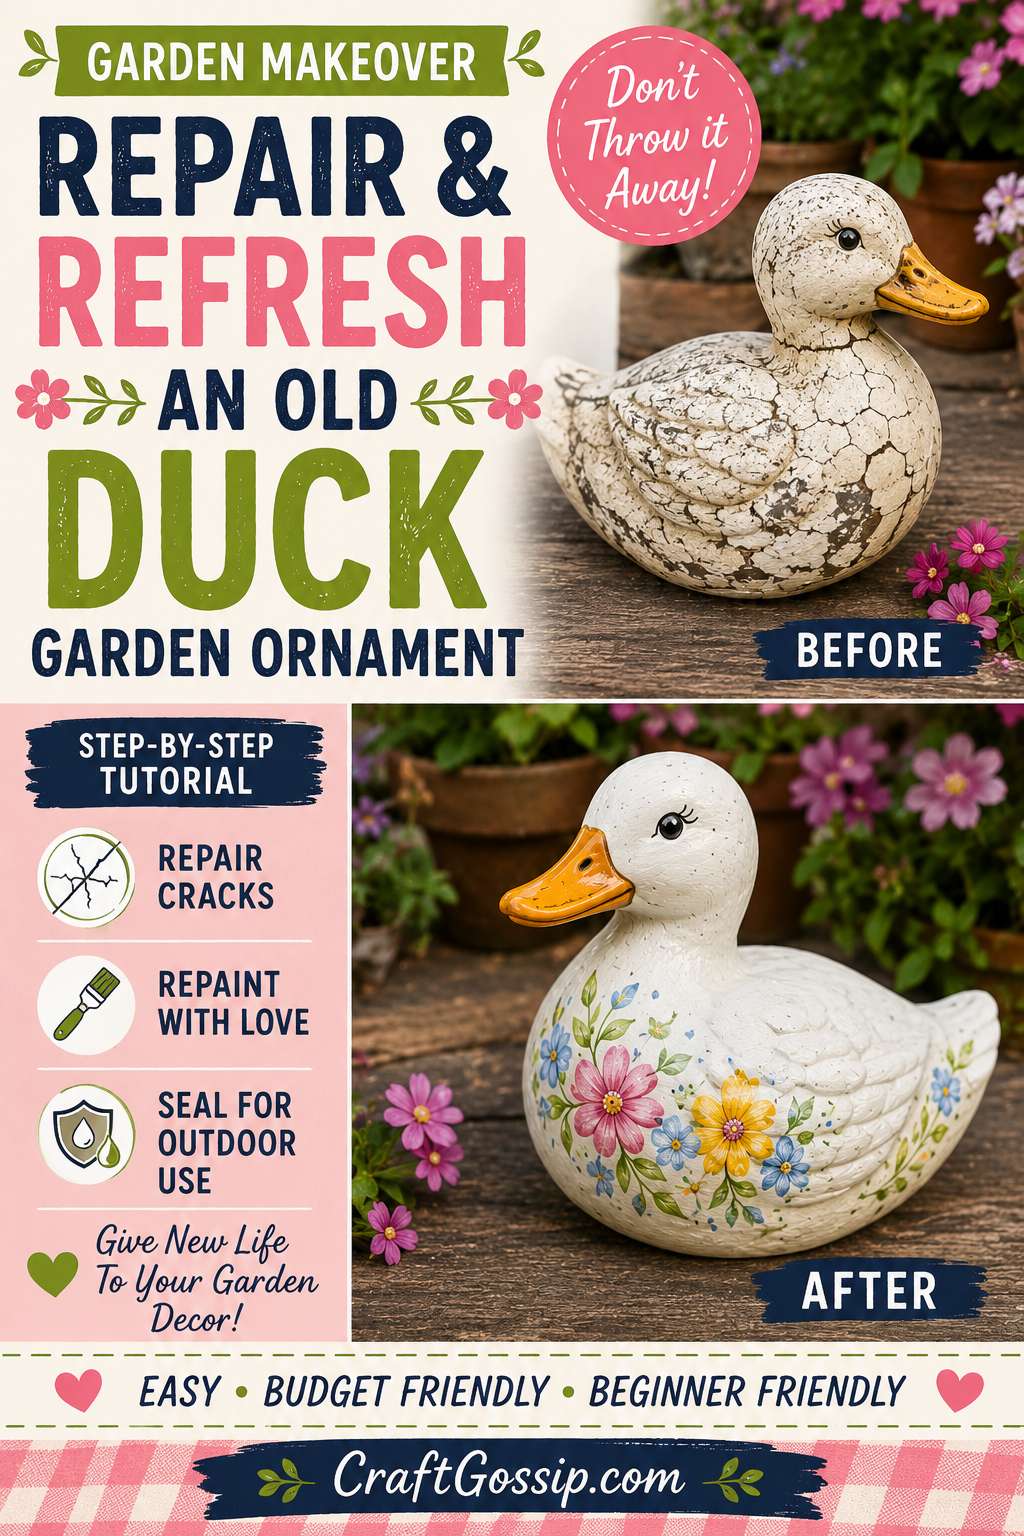
Don’t throw away that cracked old garden duck! This easy DIY shows how to clean, repair, repaint, and seal a ceramic garden ornament for a cheerful cottage garden refresh. Perfect for thrifted garden décor, upcycled outdoor crafts, and budget-friendly garden decorating ideas.
There is something about an old ceramic duck garden ornament that feels instantly nostalgic. Maybe it reminds you of your nan’s garden, or maybe you found one at the thrift shop looking slightly sad, sun-faded, and one rainfall away from retirement.
But before you send that little duck off to garden ornament heaven, let me tell you — these pieces are often very fixable.
This project is all about taking an old cracked ceramic duck ornament and giving it a fresh new life with a little cleaning, crack repair, paint, and outdoor sealant. It is one of those satisfying garden décor makeovers where the before looks a bit tragic, the middle looks questionable, and the finished duck suddenly looks like it belongs proudly beside the lavender.
If you love easy outdoor craft ideas, this is a lovely weekend project, especially if you already have leftover acrylic paints from other crafts. It also pairs beautifully with other handmade garden décor projects, like these DIY garden decorations you can make or these sweet ladybug rock painting ideas for garden décor.
Why Repair An Old Garden Ornament Instead Of Replacing It?
Garden ornaments take a beating. Sun, rain, mud, frost, sprinklers, curious dogs, and the occasional overenthusiastic gardener with a hose can all leave their mark.
Older ceramic ornaments are especially prone to:
small cracks
flaking paint
faded colours
chipped beaks, wings, or feet
water damage inside hollow pieces
old dirt and garden grime trapped in tiny crevices
But that is also what gives them charm. A brand-new ornament is nice, but a rescued duck with a few repaired battle scars? Much more personality.
This is also a great upcycling project if you enjoy thrifted garden décor, recycled craft ideas, or simple makeovers that use what you already have. You can even tuck your refreshed duck near handmade markers like these antique spoon garden markers for a lovely cottage garden feel.
What You Need
old ceramic duck garden ornament
warm soapy water
old toothbrush or soft scrubbing brush
fine-grit sandpaper
rubbing alcohol or methylated spirits
two-part epoxy adhesive
toothpick, skewer, or small craft stick
painter’s tape or masking tape
lightweight clamps, rubber bands, or soft cloth ties if needed
outdoor filler or epoxy putty for wider cracks or missing chips
acrylic paint or outdoor craft paint
paintbrushes in a few sizes
paint markers for details
clear outdoor spray sealant or outdoor varnish
gloves
drop cloth or cardboard box for spraying
If you need to stock up, look for outdoor-safe sealants, two-part epoxy, fine-grit sandpaper, and paint marker sets on Amazon. A decent pack of paint markers is one of those craft supplies you buy “for one thing” and then somehow use on twenty other projects. Funny how that happens.
Step 1: Clean The Duck Properly
Before you repair or paint anything, give your ceramic duck a proper clean.
Start outside if the ornament is very dirty. A gentle rinse with the hose can remove loose soil, cobwebs, leaves, and whatever mystery garden debris has been living inside it. If your duck is hollow, tip it carefully and let any trapped dirt or water drain out.
Then bring it to a work area and wash it with warm soapy water. Use an old toothbrush to scrub around the beak, wings, feathers, base, and any textured areas.
Let it dry completely.
And I do mean completely. Ceramic can hold moisture, especially inside cracks. If you rush this step, glue and paint may not bond properly. Leave it overnight in a warm, dry place if needed.
Step 2: Check The Cracks And Damage
Once the duck is clean and dry, inspect it carefully.
You are looking for three types of damage:
hairline cracks
open cracks
missing chips or broken sections
Hairline cracks are thin and usually still stable. Open cracks may move slightly when pressed. Missing chips or holes need filling before painting.
If the duck is broken into separate pieces, do a dry fit first. Line everything up without glue so you know how the pieces sit together. This saves a lot of panic once the epoxy is mixed.
Ask me how I know.
Step 3: Sand Any Flaking Paint
Use fine-grit sandpaper to gently smooth any rough paint edges, flaking areas, or sharp ceramic chips.
You do not need to sand the whole duck back to bare ceramic. The goal is simply to create a smooth, stable surface so the new paint has something to grip.
Wipe away dust with a damp cloth, then wipe the cracked areas with rubbing alcohol or methylated spirits to remove oils and residue.
Let it dry again before gluing.
Step 4: Repair Hairline Cracks With Epoxy
For small cracks, a two-part epoxy adhesive is usually the best choice.
Mix the epoxy according to the packet instructions. Use a toothpick or skewer to work a tiny amount into the crack. Try not to overload it — you want the adhesive inside the crack, not sitting in a huge lump on top.
Press the crack gently closed if needed and wipe away any obvious excess before it hardens. If the crack needs holding in place, use painter’s tape, rubber bands, or a soft cloth tie.
Let the epoxy cure fully. This may take several hours or overnight depending on the product.
Do not rush the cure time. Garden ornaments live outdoors, so you want that repair to be strong before you start painting over it.
Step 5: Fill Larger Cracks Or Missing Chips
If your duck has wider cracks, missing chips, or a little gap where the ceramic has crumbled, use epoxy putty or an outdoor-suitable filler.
Press a small amount into the damaged area and shape it with a damp finger, toothpick, or craft stick. Try to follow the shape of the duck’s body so the repair blends in.
For missing feather texture, you can gently carve small lines into the filler before it fully hardens. Do not worry about perfection. Once it is painted, tiny imperfections often disappear — and honestly, a garden duck does not need to look like it has had cosmetic surgery.
Let the filler cure completely, then lightly sand it smooth.
Step 6: Prime Or Base Coat The Duck
If the original colours are very dark, patchy, or shiny, give the duck a simple base coat first.
White, cream, pale grey, or soft beige works well under most colours. Use acrylic paint or outdoor craft paint and apply two thin coats rather than one thick coat.
Let each coat dry fully.
For a classic vintage garden duck look, try:
cream body with soft yellow beak
white duck with orange beak and pale blue bow
sunny yellow duck with white wing details
soft sage green and cream for a cottage garden look
duck-egg blue with floral details for a slightly cheeky modern twist
Duck-egg blue on an actual duck? Too obvious? Maybe. Still adorable.
Step 7: Paint The Main Colours
Now paint the main areas of the duck.
Use a medium brush for the body and smaller brushes for the beak, eyes, wings, and feet. Thin coats are best. Heavy paint can pool in details and make the ornament look clumpy.
Let the first coat dry, then add a second coat for better coverage.
If you want a soft vintage finish, dry brush a slightly darker shade around the feathers, base, and wing edges. This helps bring back the detail after the base coats.
For a more cheerful garden look, add tiny painted flowers, dots, leaves, or a gingham-style bow around the duck’s neck. This is where paint markers are very handy.
Step 8: Add Details And Personality
The details make the duck.
Add:
black or dark brown eyes
a small white dot in each eye for sparkle
orange shading on the beak
soft grey feather lines
little flowers on the body
a painted ribbon or bow
tiny dots around the base
blush-pink cheeks if you want full cottage-core duck drama
If your duck has a repaired crack that is still slightly visible, turn it into part of the design. Paint a vine, flower stem, feather line, or decorative stripe over the repair. This is one of my favourite tricks because it stops the repair from looking like something you are hiding.
It becomes part of the makeover instead.
Step 9: Let The Paint Cure
Once you are happy with the design, let the duck dry overnight.
Even if the paint feels touch-dry, it is worth giving it extra time before sealing. Sealing too soon can trap moisture and make the finish tacky or cloudy.
Place the duck somewhere dust-free and out of reach of pets, children, and anyone who might say, “Is this rubbish?” and move it.
Step 10: Seal For Outdoor Use
This step matters most if your duck is going back into the garden.
Use a clear outdoor spray sealant or outdoor varnish. Choose something suitable for exterior use and ideally non-yellowing.
Place the duck in a cardboard box or on a drop cloth outside. Spray several light coats rather than one heavy coat. Turn the duck carefully so you seal the front, back, sides, base, repaired areas, and any exposed ceramic.
Let each coat dry according to the product instructions.
I like three light coats for garden ornaments because they need all the help they can get against sun and rain.
Where To Display Your Repaired Duck
Once fully cured, your duck is ready to waddle back into the garden.
Try placing it:
beside a herb pot
near a birdbath
under a rose bush
on a covered verandah
beside a garden path
near a fairy garden
next to painted rocks or handmade garden markers
For longer life, avoid placing it directly in a puddle-prone area. A small flat stone, paver, or tile underneath helps keep moisture away from the base.
If you live somewhere with freezing winters, bring repaired ceramic ornaments indoors during the coldest months. Water can creep into cracks, freeze, expand, and undo all your lovely repair work.
Extra Tips For A Longer-Lasting Garden Ornament Makeover
Use outdoor-rated sealant, even if you used regular acrylic paint.
Repair cracks before painting, not after.
Let each layer dry properly.
Avoid sealing over damp ceramic.
Keep the ornament slightly raised off wet soil.
Touch up the sealant once a year if it sits in full sun.
Use paint markers for small details instead of trying to wrangle a tiny brush while muttering under your breath.
Why This Is Such A Good Garden Upcycling Project
This cracked ceramic duck makeover is exactly the sort of project I love because it saves something from being tossed, uses simple craft supplies, and gives your garden a little handmade personality.
It is also very forgiving. If your painting is not perfect, it still works. If the repair is slightly visible, add flowers. If the duck looks a bit quirky, even better. Gardens should have character, and frankly, so should ducks.
This is a lovely project for anyone who enjoys budget-friendly garden décor, thrift store makeovers, painted outdoor crafts, or easy upcycled projects that do not require fancy tools.
And once you have repaired one old garden ornament, be warned — you may start eyeing every sad ceramic frog, chipped gnome, and faded bird at the op shop as a potential makeover. That is how these things start.