• Home
  • Suggest A Craft
  • DIY Newsletter

Recycled Crafts

Creative DIY Projects That Turn Trash Into Treasure

  • About CraftGossip
  • Our Network
    • Bath & Body Crafts
    • Candle Making Ideas
    • Crochet Ideas
    • Cross Stitch
    • Edible Crafts
    • Felting Patterns
    • Glass Art
    • Home & Garden Ideas
    • Indie Crafts
    • Jewelry Making
    • Kids Crafts
    • Knitting Patterns
    • Lesson Plans
    • Needlework
    • Party Ideas
    • Polymer Clay
    • Quilting Ideas
    • Recycled Crafts
    • Scrapbooking
    • Sewing Patterns
    • Card Making
    • DIY Weddings
    • Not Craft Ideas
  • Giveaways
  • Roundups
  • Store
  • Search

How to make mini Toilet paper tube lanterns

December 26, 2013 by Stefanie Girard

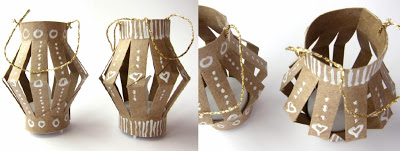
I am constantly amazed at what you crafty peeps come up with to make out of paper tubes. I am so going to make these for decorating for spring. Pop on over to the blog vlijtig to see her creation and the link to the tutorial on how to make tp tube lanterns.

These mini TP tube lanterns can be used for various creative purposes, including:

  1. Decorative Lighting: Place LED tea lights or string lights inside the mini paper lanterns to create soft, ambient lighting for parties, weddings, or special events [1].
  2. DIY Centerpieces: Arrange the mini lanterns as part of centerpieces for tables at events or celebrations. They add a charming touch and can be customized to match any theme or color scheme.
  3. Home Decor: Hang these lanterns in clusters or individually around your home to add a whimsical and eco-friendly element to your decor. They can be hung from ceilings, windows, or outdoor structures.
  4. Kids’ Crafts: These mini lanterns are perfect for children’s craft projects. Kids can personalize them with paint, markers, or stickers, fostering creativity and imagination.
  5. Gifts and Party Favors: Fill the mini lanterns with small treats or trinkets and give them as party favors or gifts for guests at weddings, baby showers, or birthdays. They serve as unique and eco-conscious tokens of appreciation.

These versatile paper lanterns offer endless possibilities for DIY projects, decor accents, and creative expressions.


Related Posts:

  • 45 amazing ways to reuse and recycle old playing cards
  • How to make recycled clothes pin puppets
«
»

Have you read?

How To Make A Milk Carton Village – A Recycled Craft for Kids

Ready to turn your recycling bin into a colorful, miniature village? Grab those empty milk cartons and let’s create a town filled with tiny houses, shops, and even a school or bakery! This craft is perfect for kids of all ages and encourages imagination, storytelling, and eco-friendly creativity.

 What You’ll Need:

  • Empty milk or juice cartons (washed and dried)

  • Paints or markers

  • Paintbrushes

  • Craft glue or glue stick

  • Scissors (adult supervision recommended)

  • Colored paper or old magazines

  • Bottle caps, buttons, or plastic lids (for windows or decorations)

  • Sticks, straws, or skewers (for flag poles or chimneys)

  • Optional: glitter, stickers, washi tape, cotton balls (for snow or clouds!)

 Step-by-Step Instructions:

Step 1: Clean and Prep the Cartons
Make sure your milk or juice cartons are washed and completely dry. Remove any plastic lids or caps and keep them for decorations!

Step 2: Plan Your Village
Decide how many buildings you want to make. Each milk carton becomes a house, shop, or whatever your imagination dreams up. Arrange them side by side or in a circle like a real village square.

Step 3: Cut Out Doors and Windows
With the help of an adult, carefully cut small door and window shapes into your cartons. You can also glue cut-out shapes from colored paper if you’d rather not cut into the carton.

Step 4: Paint and Decorate
Use paint or markers to bring your buildings to life. Make brick patterns, colorful siding, or roof tiles. Let each child choose their own theme – rainbow bakery, monster house, fairy home, or tiny fire station!

Step 5: Add the Roofs
You can paint the top pointy part of the carton like a roof, or glue on cardboard triangles to create overhangs. Want to add a chimney? Glue a straw or cardboard roll on top!

Step 6: Make Flags and Signs
Cut small flags from recycled plastic or paper and tape them to straws or sticks. Glue your flags to the rooftops. You can even create tiny signs for each building – “Toy Store,” “Library,” or “Super Cat’s House.”

Step 7: Build Your Village
Place all the finished buildings together on a large piece of cardboard, tray, or table. Use bottle caps for stepping stones, cotton balls for bushes or clouds, and draw roads with marker.

Step 8: Play!
Now that your village is built, use little toys, action figures, or LEGO people to live in your new town. Create stories and adventures—your Milk Carton Village is officially open!

 Learning Bonus:

This craft is not just fun—it also teaches recycling, fine motor skills, creative thinking, and storytelling. Plus, it’s a great group activity for playdates, classrooms, or family craft nights.

Let your kids’ imaginations run wild—and remember, no two villages need to look the same. Each one tells its own story!

Explore

books Christmas CraftGossip Giveaways Craft Inspirations Easter glass halloween Home Decor kid crafts More Crafts Patterns & Tutorials recycled art Recycled Clothing Recycled Jewelry Recycled kids crafts Recycled Sewing Recycled Tutorials Recycling Ideas Recycling Organizing tin can

RSS More Articles

  • Etsy Spotlight – The Thomas Boys Shirt Sewing Pattern
  • 7 FREE Back to School SVG Cut Files
  • Cozy Toes Await: Cable Crochet Slipper Boots Botties Wool Insoles Kit
  • How to Make a Sticks and Stones Quilt – Free Quilting Tutorial
  • Printable Cross Stitch Sheets Make it Easy to Cross Stitch on Clothes
  • Layered Embroidery on Watercolor Fabric: Mixed Media Magic
  • Paf – Panda Dad Free Crochet Pattern
  • How To Use Bath Salts in the Shower Without a Bath – Relaxation, Skincare, and a DIY Salt Recipe
  • How to Make Two Labubu Greeting Cards
  • DIY Fabric Twine Plant Hanger: A Stylish Way to Display Your Plants

Copyright © 2025 · CraftGossip | Start Here | Contact Us | Link to Us | Your Editors | Privacy and affiliate policy