• Home
  • Suggest A Craft
  • DIY Newsletter

Recycled Crafts

Creative DIY Projects That Turn Trash Into Treasure

  • About CraftGossip
  • Our Network
    • Bath & Body Crafts
    • Candle Making Ideas
    • Crochet Ideas
    • Cross Stitch
    • Edible Crafts
    • Felting Patterns
    • Glass Art
    • Home & Garden Ideas
    • Indie Crafts
    • Jewelry Making
    • Kids Crafts
    • Knitting Patterns
    • Lesson Plans
    • Needlework
    • Party Ideas
    • Polymer Clay
    • Quilting Ideas
    • Recycled Crafts
    • Scrapbooking
    • Sewing Patterns
    • Card Making
    • DIY Weddings
    • Not Craft Ideas
  • Giveaways
  • Roundups
  • Store
  • Search

How to make iridescent Fairy wings

April 6, 2015 by Stefanie Girard

UPDATE Jul 2020: The original website has been taken down. We have saved a PDF copy of this tutorial that you can download: How-to-make-iridescent-wings.

Fantasywing18

I love it when I look at something and think it is made with some special product only to read the tutorial to find out it is made out of recycled elements I already have in my stash.

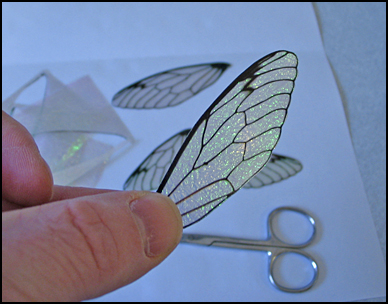
These pretty iridescent wings are just such a project. Pop on over to the website OOAK sculptor for the tutorial on how to make iridescent wings along with a tutorial on how to make wired wings and software to design wings! This technique would be great for all sorts of mixed-media projects and designs.

Making iridescent fairy wings can be a fun and creative activity for kids or adults, and there are a few different methods you can use to create these magical wings. Here’s a simple tutorial for making iridescent fairy wings using materials you can find around the house:

Materials needed:

  • Plastic takeaway packaging
  • Scissors
  • Glue
  • Acrylic paint (in iridescent or metallic colors)
  • Clear plastic wrap
  • Optional: glitter, sequins, or other decorative items

Instructions:

  1. Begin by cutting out the shape of the wings from a firm clear plastic, I like to recycle takeaway containers. Clear lids of gift boxes also work well. You can use a template or draw your own design.
  2. Once you have the shape of the wings cut out, use glitter glue to coat the entire wing as the base color This will give the wings a shimmering, iridescent effect.
  3. Once the glue has dried, use acrylic paint to add color and detail to the wings. You can use iridescent or metallic paints for a more realistic effect, or you can mix and match different colors to create your own unique look.
  4. If desired, you can also add glitter, sequins, or other decorative items to the wings to give them an extra touch of sparkle and shine.
  5. Once the paint and decorations have dried, your iridescent fairy wings are ready to use.

With a little bit of creativity and some basic craft materials, you can create your own beautiful and unique iridescent fairy wings. Whether you’re dressing up for a costume party or just want to add a touch of magic to your everyday life, these shimmering wings are sure to delight and inspire.


These wings are easy to make and can be adapted for Christmas angel wings and fairy wings too. I think these DIY wings would love adorable on Christmas angels just with changing the shape of the design.


Related Posts:

  • Upcycling or Hoarding? Why Your DIY Projects Could…
  • How to make recycled clothes pin puppets
«
»

Comments

  1. Theresa says

    April 7, 2015 at 11:30 pm

    The instructions for the wings look easy to do but the link provided for the wiring does not work.

  2. Donna says

    July 19, 2020 at 4:08 pm

    I cannot see the wing patterns

  3. Vikram Goyal says

    July 25, 2020 at 5:41 pm

    Hi Donna – At the top of the post we have saved a PDF copy.

  4. Mary Brown says

    July 27, 2020 at 7:48 pm

    Where do you get the file to print out the diagram of the wings?

Have you read?

Floppy Disk Crafts: Clever Ways to Upcycle Retro Tech

Floppy disk recycled crafts title

Remember floppy disks? Those square little tech relics that used to hold our precious documents and school assignments? If you’ve got a stash of them hiding in the back of a drawer—or you stumble across some at a thrift store—don’t toss them just yet. Floppy disks are surprisingly perfect for upcycled crafting, and these ideas will have you looking at old tech in a totally new way.

One of the most popular ways to breathe new life into these retro icons is by turning them into DIY wall clocks. Whether you keep it simple with one floppy as the clock face or build a larger wall piece using multiple disks, the result is a geeky, functional work of art. Check out the step-by-step guide on Instructables for building your own floppy disk wall clock—it’s a timeless craft, literally!

Want to carry your nostalgia with you? Then you’ll love the floppy disk purse or bag ideas. These functional fashion statements are made entirely from joined-up disks, forming a sturdy and super unique bag. There are tutorials on how to make a full shoulder bag, a clutch, and even a pencil case using nothing but zip ties and some creativity.

Need a conversation-starting piece of décor? A floppy disk chandelier might be just the thing. It’s bold, futuristic, and a brilliant way to show off your upcycling skills. Alternatively, you can go green and make a floppy disk planter—perfect for succulents or desk plants. Just pop out the disk’s center, line it with plastic, and add soil. It’s easy, stylish, and great for small-space gardening.

Looking for quick, crafty projects? Try turning a floppy into a notepad, a photo frame, or a cutlery holder. These smaller projects make great DIY gifts, and they’re perfect for crafters who want instant gratification. You can even make Christmas bows or flowers out of old disks for a fun and shiny holiday twist.

For those who love organizing their craft supplies or electronics, floppy disks can be transformed into component organizers or bill caddies. With a little hot glue and imagination, they make excellent mini shelving units and storage boxes.

Feeling ambitious? Dive into the more elaborate builds like a laptop desk, a lampshade, or even a quirky birdhouse made entirely from floppy disks. These projects take upcycling to the next level and are sure to impress anyone who sees them.

Make a Floppy Disk Wall Clock : 9 Steps – Instructables

Floppy Disk Bag : 12 Steps (with Pictures) – Instructables

Geeky Floppy Note Pad — CraftBits.com

Floppy Disk Chandelier : 8 Steps (with Pictures) – Instructables

DIY Floppy Disk Planters – Brit + Co /

Floppy Disk Planter  

Floppy Disk Art

How to Turn Old Floppy Disks Into Bracelets, Necklaces, or Belts – Instructables 

Upcycled Component Organizer – Make:

Floppy disk photo frame

Wall Clock 

DIY Floppy Disk Planter

Floppy Disk Art | Euromaxx

Bird house 

Cutlery Holder

Floppy Disks Into Pencil Cases • Recyclart 

Floppy Disk Bill Caddy : 3 Steps – Instructables

Make a Floppy Disk Wall Clock : 9 Steps – Instructables 

Floppy Disk Laptop Desk/Stand – Instructables

Disk Combobulation 

Floppy Disk Succulent Planter : 3 Steps (with Pictures) – Instructables 

Floppy Disk Lampshade (with Pictures) – Instructables

Recycled Flowers From DVDs, CDs, and Floppy Disks

USB Flash Diskette : 7 Steps (with Pictures) –

Christmas Bow / Flower From Floppy Disks : 7 Steps (with Pictures) 

Notebook From Old Floppy Disks : 9 Steps (with Pictures)

And of course, there’s wearable tech too. You can cut up and reshape floppy disks into bracelets, necklaces, or belts that scream ’80s nostalgia. It’s retro-futurism at its finest.

Let’s not forget about combining media: recycled flowers and art pieces that use floppy disks, CDs, and DVDs together to create dazzling pieces with texture and shine. Whether you’re decorating your craft room or making a gallery-worthy art piece, these materials are a dream to experiment with.

So next time you come across a box of floppy disks, don’t see e-waste—see endless crafting possibilities. With just a few tools and a lot of imagination, you can turn outdated tech into something totally unique and totally you.

Explore

books Christmas CraftGossip Giveaways Craft Inspirations Easter glass halloween Home Decor kid crafts More Crafts Patterns & Tutorials recycled art Recycled Clothing Recycled Jewelry Recycled kids crafts Recycled Sewing Recycled Tutorials Recycling Ideas Recycling Organizing tin can

RSS More Articles

  • Floppy Disk Crafts: Clever Ways to Upcycle Retro Tech
  • Etsy Spotlight: Goose Baby Lovey PDF Pattern
  • Summer Accordion Mini Album
  • How to Make 3 NEW Pinwheel Quilts – Free Quilting Tutorial
  • Spray Paint Makeover Magic: How a Wicker Table (and My Chairs!) Got a New Life
  • DIY Grape Creatine Gummy Bears – Big, Bold and Packed with Power
  • Crochet Your Own Adorable Amigurumi Tiny Baymax – Free Pattern
  • Crow Cross Stitch Patterns
  • Free Crochet Pattern – Ingrid
  • How to Watercolor on Black Cardstock for a Floral Card

Copyright © 2025 · CraftGossip | Start Here | Contact Us | Link to Us | Your Editors | Privacy and affiliate policy