• Home
  • Suggest A Craft
  • DIY Newsletter

Recycled Crafts

Creative DIY Projects That Turn Trash Into Treasure

  • About CraftGossip
  • Our Network
    • Bath & Body Crafts
    • Candle Making Ideas
    • Crochet Ideas
    • Cross Stitch
    • Edible Crafts
    • Felting Patterns
    • Glass Art
    • Home & Garden Ideas
    • Indie Crafts
    • Jewelry Making
    • Kids Crafts
    • Knitting Patterns
    • Lesson Plans
    • Needlework
    • Party Ideas
    • Polymer Clay
    • Quilting Ideas
    • Recycled Crafts
    • Scrapbooking
    • Sewing Patterns
    • Card Making
    • DIY Weddings
    • Not Craft Ideas
  • Giveaways
  • Roundups
  • Store
  • Search

How to make a recycled wine cork adorable sheep perfect for Easter decorating

February 24, 2022 by Stefanie Girard

As Easter approaches, many people are starting to think about how to decorate their homes and gardens for the season. While there are many traditional decorations like Easter eggs, bunnies, and flowers, one unique and eco-friendly option that is gaining popularity is recycled wine cork adorable sheep.

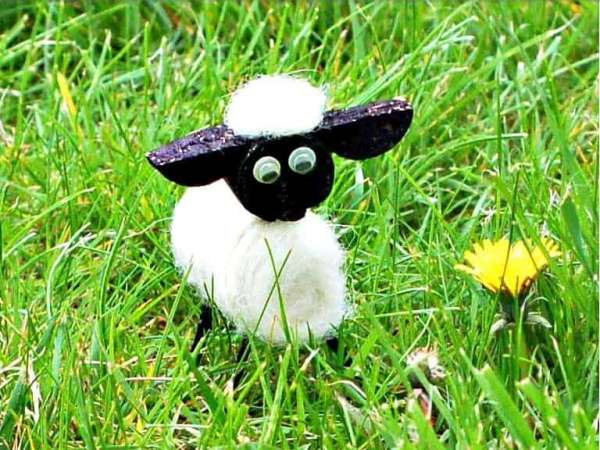
These charming little creatures are made from recycled wine corks, which are transformed into cute and fluffy sheep using a few simple craft supplies. Not only are these sheep a creative and fun addition to any Easter display, but they also provide a great way to repurpose materials that might otherwise be thrown away.

These can be displayed on a table, mantel, or windowsill, or used as part of a larger Easter display. They can also be hung from a tree or shrub in your garden to add some whimsy and charm to your outdoor space.

In addition to being a great Easter decoration, recycled wine cork adorable sheep also make for a fun and engaging craft activity. This is a great project to do with kids, as it allows them to get creative and learn about the importance of recycling and repurposing materials.

To make a recycled wine cork adorable sheep, all you need are some wine corks, white paint, black paint, a paintbrush, a hot glue gun, and some cotton balls or white pom poms. Start by painting the wine corks white and allowing them to dry completely. Then, use the black paint to add eyes, nostrils, and a mouth to the front of the cork….

But wait, before that, drink up that wine…or hit up your friends and family…I’m sure we all know a wine drinker 🙂 and get your fluffy yarn scraps together so you can make a flock of these adorable recycled wine cork sheep.

… and then pop on over to the blog Craft Invaders for the step by step tutorial on how to to make recycled wine cork sheep perfect to decorate for Easter.

Related Posts:

  • How to make concrete Easter eggs
  • How to make recycled clothes pin puppets
«
»

Have you read?

DIY Kids Craft Project – Upcycled Cardboard Box Sandcastle

kids-upcycled-cardboard-sandcastle

Looking for a creative way to keep the kids entertained this summer without spending a fortune? Turn your trash into treasure with this fun Recycled Sandcastle Craft Project! Using cardboard boxes, plastic lids, glue, and a bit of imagination, kids can build their very own sandcastle kingdom – no beach required!


What You’ll Need:

  • Cardboard boxes (cereal, tissue, shipping boxes – any size)

  • Toilet paper rolls or paper towel tubes

  • Plastic lids (yogurt containers, jar tops, etc.)

  • Paper or plastic straws, twigs, or sticks

  • Scrap plastic, paper, or fabric for flags

  • Craft glue or a hot glue gun (with adult supervision)

  • Scissors

  • Sand or beige paint (optional for decoration)

  • Markers, stickers, or leftover craft supplies to decorate

Step-by-Step Instructions:

Step 1: Gather and Prep Your Recyclables

Head to your recycling bin and pull out clean items that could work as castle parts—boxes for walls, tubes for towers, and lids for turrets. Cut down the boxes into smaller sections if needed, and make sure everything is dry and ready to work with.

Step 2: Plan Your Castle Layout

Before gluing anything down, lay out your castle design on a flat surface. Decide where the towers, walls, and “gate” will go. You can make it symmetrical, or go wild with a quirky kingdom layout!

Step 3: Glue the Main Structure Together

Use craft glue (or hot glue if you’re working with older kids or want faster drying). Start attaching the boxes and tubes together to form the base of your sandcastle. Stack tubes on top of boxes to create turrets. Use plastic lids as domes or roof tops.

Step 4: Add Decorative Elements

This is where the fun begins! Use:

  • Bottle caps as windows or shields

  • Buttons as faux stones

  • Cutout shapes from scrap cardboard for castle doors or battlements (those square-topped castle walls!) Get creative with what you’ve got – there’s no wrong way to build your dream castle.

Step 5: Make and Add Flags

Cut small triangles or flags from scrap plastic, fabric, or colored paper. Tape or glue these to the tops of straws, sticks, or twigs. Then, glue them onto the tops of towers or castle corners. You can even personalize each flag with a coat of arms or your child’s initials!

Step 6: Add the “Sand” Effect (Optional)

For an authentic look, brush glue over the castle and sprinkle it with craft sand. No sand on hand? Use beige paint, or mix some flour with a pinch of cinnamon for a sandy texture.

Step 7: Let it Dry and Display!

Let everything dry completely—especially if you’ve used a lot of glue. Then proudly display your recycled sandcastle on a shelf, or use it as part of imaginative play time.

Bonus Ideas:

  • Build a whole sandcastle village and connect them with paper bridges.

  • Make tiny “people” out of clothespins or paper scraps.

  • Add fairy lights inside for a magical castle glow at night.

This project is a fantastic way to keep little hands busy and teach kids the value of reusing materials. Plus, it’s just plain fun! Whether you’re doing this at home, in a classroom, or at a summer camp, your recycled sandcastles are sure to be a hit.

Explore

books Christmas CraftGossip Giveaways Craft Inspirations Easter glass halloween Home Decor kid crafts mason jar More Crafts Patterns & Tutorials recycled art Recycled Clothing Recycled Jewelry Recycled Sewing Recycled Tutorials Recycling Ideas Recycling Organizing tin can

RSS More Articles

  • Unlock the Secrets of Stunning Stitches: Why The Geometry of Hand-Sewing Will Transform Your Craft Forever
  • Summer Math Games for Kids
  • A Children’s Book About A Quilt Maker – Perfect Gift Idea
  • DIY Kids Craft Project – Upcycled Cardboard Box Sandcastle
  • How to Make a Taylor Swift Inspired Card
  • 20 Wheelchair Friendly Sewing Patterns
  • Create a Stunning DIY Headboard That Will Completely Transform Your Bedroom
  • Matariki Magic: Fun and Meaningful Activities for Kids to Celebrate the Maori New Year
  • D&D Cross Stitch Patterns
  • 12 Summer Vibes Scrapbook Layout Ideas

Pick Your Blog

  • Sewing
  • Knitting
  • Quilting
  • Crochet
  • Home & Garden
  • Recycled Crafts
  • Scrapbooking
  • Card Making
  • Polymer Clay
  • Cross-Stitch
  • Edible Crafts
  • Felting
  • Glass Art
  • Indie Crafts
  • Kids Crafts
  • Jewelry Making
  • Lesson Plans
  • Needlework
  • Bath & Body
  • Party Ideas
  • Candle Making
  • DIY Weddings
  • Not Craft
  • Free Craft Projects

Copyright © 2025 · CraftGossip | Start Here | Contact Us | Link to Us | Your Editors | Privacy and affiliate policy