• Home
  • Suggest A Craft
  • DIY Newsletter

Recycled Crafts

Creative DIY Projects That Turn Trash Into Treasure

  • About CraftGossip
  • Our Network
    • Bath & Body Crafts
    • Candle Making Ideas
    • Crochet Ideas
    • Cross Stitch
    • Edible Crafts
    • Felting Patterns
    • Glass Art
    • Home & Garden Ideas
    • Indie Crafts
    • Jewelry Making
    • Kids Crafts
    • Knitting Patterns
    • Lesson Plans
    • Needlework
    • Party Ideas
    • Polymer Clay
    • Quilting Ideas
    • Recycled Crafts
    • Scrapbooking
    • Sewing Patterns
    • Card Making
    • DIY Weddings
    • Not Craft Ideas
  • Giveaways
  • Roundups
  • Store
  • Search

How to make a giant XO die cut letter no-sew Valentine pillow

February 11, 2019 by Stefanie Girard

I am so excited about these giant 6 inch alphabet letter dies. I have been lucky enough to get an advance set of the 26 letter dies.

Do they look like something you would like to add to your die collection and use to make all sorts of things like this no-sew XO Valentine’s Day pillow and other things like party banners, greeting cards, scrapbook pages, altered book pages, art, and so much more? Well, leave a comment in today’s post and I will let you know when they become available!

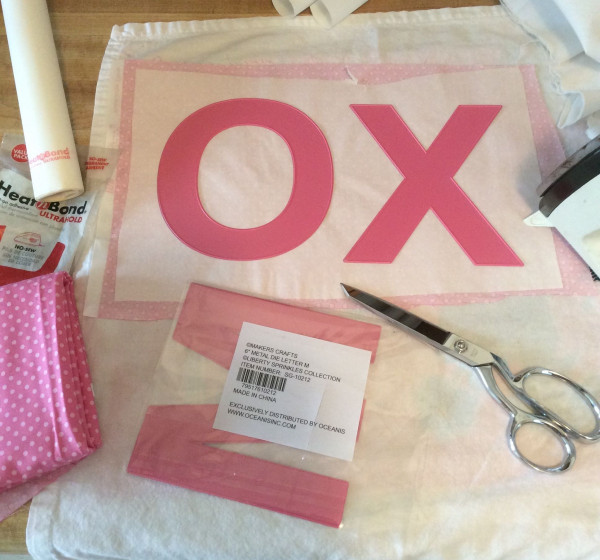
First up I ironed some Heat n Bond onto the back of some cute pink polka dot quilt fabric.

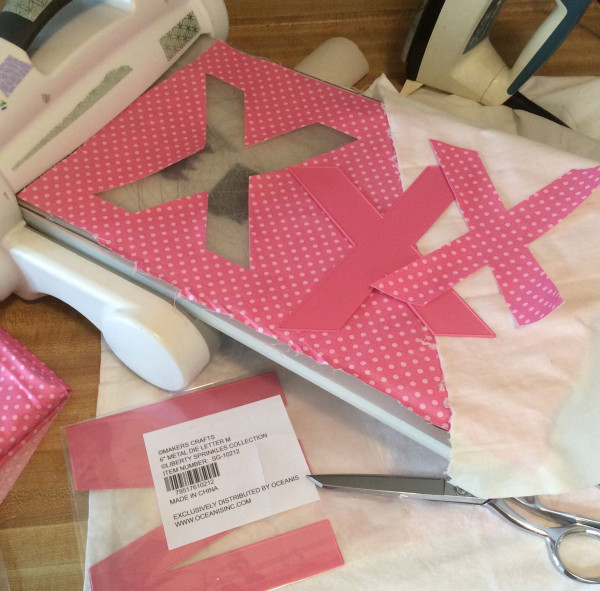
Then I die cut the giant 6 inch letter die X first.

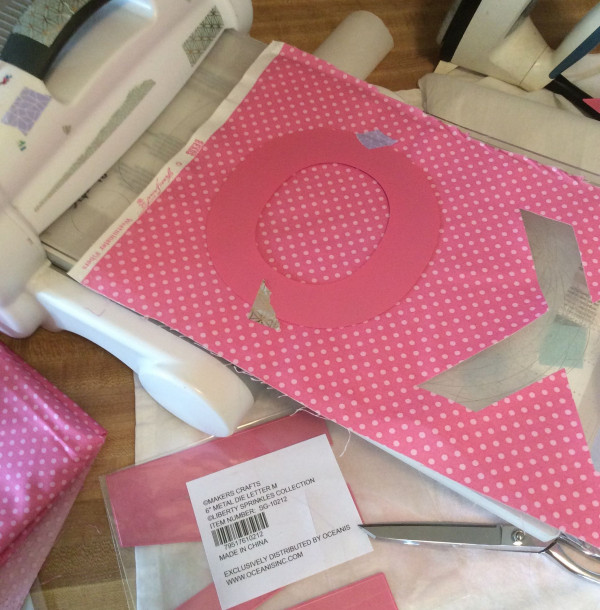
Then I lined up the 6 inch letter die “O” and secured it with a bit of washi tape so it didn’t shift out of alignment while die cutting.

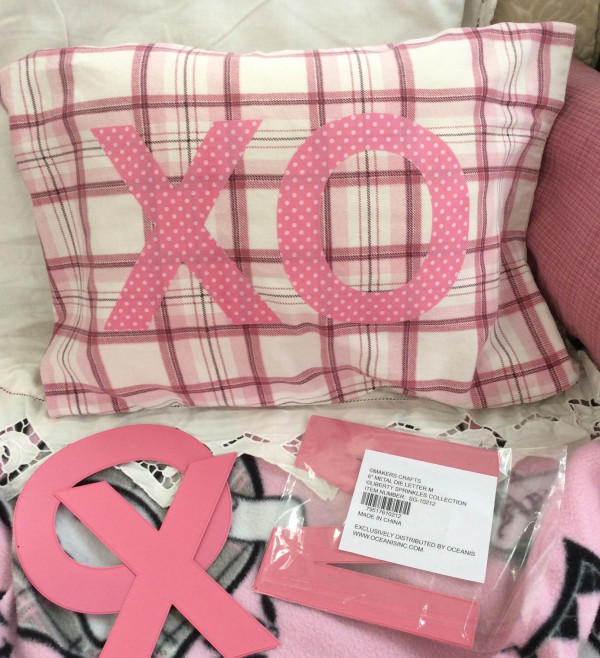
Two perfect 6 inch die cut block letters ready to iron onto a pillow case to upcycle it for Valentine’s Day.

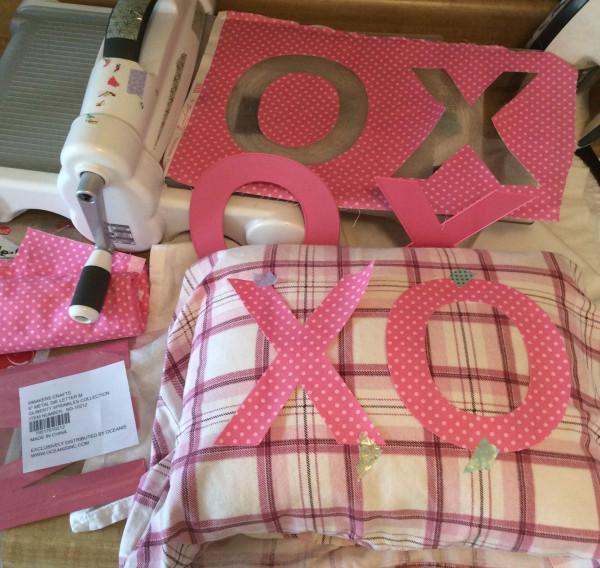
I slipped the pillow case over the pillow and used a bit of washi tape again to place the iron-on die cut six inch letters.

Then I slipped the pillow case off, pealed the backing paper of off the die cut letters and ironed the die cut letters X and O onto the pink plaid pillow case.

I am looking forward to adding all sorts of words and letters onto everything using these new 6 inch letter dies.

You too? Leave a comment and I’ll keep you posted when they become available!

XO my Recycled Crafts readers.

Related Posts:

  • 45 amazing ways to reuse and recycle old playing cards
  • Creative Ways to Reuse UNO Cards: Fun Upcycled Crafts to Try
«
»

Have you read?

How To Make A Milk Carton Village – A Recycled Craft for Kids

Ready to turn your recycling bin into a colorful, miniature village? Grab those empty milk cartons and let’s create a town filled with tiny houses, shops, and even a school or bakery! This craft is perfect for kids of all ages and encourages imagination, storytelling, and eco-friendly creativity.

 What You’ll Need:

  • Empty milk or juice cartons (washed and dried)

  • Paints or markers

  • Paintbrushes

  • Craft glue or glue stick

  • Scissors (adult supervision recommended)

  • Colored paper or old magazines

  • Bottle caps, buttons, or plastic lids (for windows or decorations)

  • Sticks, straws, or skewers (for flag poles or chimneys)

  • Optional: glitter, stickers, washi tape, cotton balls (for snow or clouds!)

 Step-by-Step Instructions:

Step 1: Clean and Prep the Cartons
Make sure your milk or juice cartons are washed and completely dry. Remove any plastic lids or caps and keep them for decorations!

Step 2: Plan Your Village
Decide how many buildings you want to make. Each milk carton becomes a house, shop, or whatever your imagination dreams up. Arrange them side by side or in a circle like a real village square.

Step 3: Cut Out Doors and Windows
With the help of an adult, carefully cut small door and window shapes into your cartons. You can also glue cut-out shapes from colored paper if you’d rather not cut into the carton.

Step 4: Paint and Decorate
Use paint or markers to bring your buildings to life. Make brick patterns, colorful siding, or roof tiles. Let each child choose their own theme – rainbow bakery, monster house, fairy home, or tiny fire station!

Step 5: Add the Roofs
You can paint the top pointy part of the carton like a roof, or glue on cardboard triangles to create overhangs. Want to add a chimney? Glue a straw or cardboard roll on top!

Step 6: Make Flags and Signs
Cut small flags from recycled plastic or paper and tape them to straws or sticks. Glue your flags to the rooftops. You can even create tiny signs for each building – “Toy Store,” “Library,” or “Super Cat’s House.”

Step 7: Build Your Village
Place all the finished buildings together on a large piece of cardboard, tray, or table. Use bottle caps for stepping stones, cotton balls for bushes or clouds, and draw roads with marker.

Step 8: Play!
Now that your village is built, use little toys, action figures, or LEGO people to live in your new town. Create stories and adventures—your Milk Carton Village is officially open!

 Learning Bonus:

This craft is not just fun—it also teaches recycling, fine motor skills, creative thinking, and storytelling. Plus, it’s a great group activity for playdates, classrooms, or family craft nights.

Let your kids’ imaginations run wild—and remember, no two villages need to look the same. Each one tells its own story!

Explore

books Christmas CraftGossip Giveaways Craft Inspirations Easter glass halloween Home Decor kid crafts More Crafts Patterns & Tutorials recycled art Recycled Clothing Recycled Jewelry Recycled kids crafts Recycled Sewing Recycled Tutorials Recycling Ideas Recycling Organizing tin can

RSS More Articles

  • Knit a Stunning Shawl That Wears Like a Collar
  • How to Make a Summer Pocket Mini Scrapbook Album
  • Book Review: This is How a Ball Rolls
  • A Sweet Top to Show Off Colorful Yarns
  • Egyptian Eye Throw – Crochet Pattern
  • Easy to make fall garland
  • Fancy Pumpkin Cross Stitch Patterns
  • DMC Orange Punch Needle Pattern
  • How To Make A Milk Carton Village – A Recycled Craft for Kids
  • Easy Sleeveless Top – Free Crochet Pattern

Copyright © 2025 · CraftGossip | Start Here | Contact Us | Link to Us | Your Editors | Privacy and affiliate policy