• Home
  • Suggest A Craft
  • DIY Newsletter

Recycled Crafts

Creative DIY Projects That Turn Trash Into Treasure

  • About CraftGossip
  • Our Network
    • Bath & Body Crafts
    • Candle Making Ideas
    • Crochet Ideas
    • Cross Stitch
    • Edible Crafts
    • Felting Patterns
    • Glass Art
    • Home & Garden Ideas
    • Indie Crafts
    • Jewelry Making
    • Kids Crafts
    • Knitting Patterns
    • Lesson Plans
    • Needlework
    • Party Ideas
    • Polymer Clay
    • Quilting Ideas
    • Recycled Crafts
    • Scrapbooking
    • Sewing Patterns
    • Card Making
    • DIY Weddings
    • Not Craft Ideas
  • Giveaways
  • Roundups
  • Store
  • Search

How to make a ghost treat bucket

October 26, 2012 by Stefanie Girard

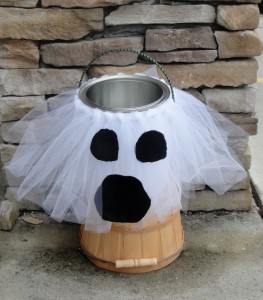
Over at the blog Ribbons and Bows Oh My! there is a fun tutorial on how to make a recycled bucket ghost treat pail.

Supplies:

  • Paint can or another bucket container
  • White paper or paint
  • White tulle
  • Hot glue gun
  • Black fabric or paper
  • 3/8? ribbon for handle
  • Double sided tape

Directions:

1. Begin by wrapping your paint can in white paper or painting it white so that the silver can won’t show through the tulle. You can skip this step if your bucket is already white or clear. Next, you need to cut your strips of tulle. My paint can is 7.5? tall, so the length of your strips may vary from mine. Here’s what I needed for the paint can: 20-18? long strips, 4-8? long strips.

2. Line the top edge of your container with double sided tape. Adhere your four 8? strips along the top of the paint can(the 6? side should be touching the top of the can). This should create a “base layer” of tulle for your ghost.

3. Tie a knot in the center of all of your 18? tulle strips.

4. Glue your tulle knots to the top of the paint can so that the tails hang down. Continue this around the entire top of the container.

5.  Your paint can is starting to look a little ghostly :)   I wrapped my handle with Black RABOM Iridescence to add a little extra flair to my bucket.

6. Now it’s time for a face. Cut a ghost face out of black fabric or paper. I cut two small circles and one larger “oval” out of black fleece. Glue your face pieces onto the tulle that is on the front of the paint can.

Now your bucket is ready for some candy!

You could use this same method to make a Pumpkin Trick or Treat Bucket as well. Use orange tulle instead of white, and wrap the handle in apple solid grosgrain. It would be fun to cut out different scary jack-o-lantern faces.

Have fun making your very own Trick or Treat Buckets!

Related Posts:

  • How to dip-dye scrap fabric ribbons perfect for…
  • How to make recycled clothes pin puppets
«
»

Have you read?

DIY Review: Handmade Wooden American Flag – Rustic, Patriotic, and Perfectly Imperfect


I don’t know about you, but there’s something extra special about décor that’s both meaningful and made by hand. That’s exactly what drew me to this gorgeous DIY wooden American flag from Reinvented Delaware. It’s rustic. It’s bold. It’s brimming with character. And the best part? It’s made using reclaimed wood, which gives it that perfect weathered look that screams vintage Americana.

This isn’t one of those quick, cookie-cutter craft projects. It’s the kind of DIY that feels like a labor of love—in the best possible way. Cindy walks you through the whole process with easy-to-follow steps, and I found myself nodding along, thinking, “Yes, I could totally make this.”

Using scrap wood from previous projects (we love a good upcycled decor idea, right?), she cuts, paints, and assembles each stripe with care. What really makes this piece shine is the attention to the little imperfections—the uneven brush strokes, the subtle distressing, the real wood grain showing through. It’s that handmade touch that gives it soul.

And let’s talk about those stars for a second. Instead of using a stencil or printed decals, she goes full-on old-school by hand painting them—flaws and all. It’s not about perfection here. It’s about capturing that raw, rugged beauty that makes patriotic farmhouse decor feel real and lived-in.

Once assembled, the flag makes a statement—whether it’s displayed on a porch, hung in a cozy entryway, or propped on a mantel. It’s bold, but not flashy. Americana, but not tacky. Just honest, beautiful handmade home decor with a patriotic twist.

Personally, I love that this project honors not just the flag, but the idea of reusing and recycling materials to create something new. It’s a subtle reminder that old things still have value and that a little creativity goes a long way.

So if you’ve got some extra lumber lying around (or you love haunting the scrap bin at your local hardware store like I do), this is the kind of weekend project that satisfies your creative itch and leaves you with something meaningful to display. Bonus points if you already have red, white, and blue paint in your stash.

Bottom line: this DIY is a winner. Whether you’re crafting for the Fourth of July, Memorial Day, or just love a good rustic statement piece, this DIY reclaimed wood flag is a project with heart.

Explore

books Christmas CraftGossip Giveaways Craft Inspirations Easter glass halloween Home Decor kid crafts mason jar More Crafts Patterns & Tutorials recycled art Recycled Clothing Recycled Jewelry Recycled Sewing Recycled Tutorials Recycling Ideas Recycling Organizing tin can

RSS More Articles

  • Sewing Review: Burda’s Sari Sewing Pattern – A Creative Twist on Tradition
  • 12 Scrapbook Layout Ideas for Boys
  • Forty-Five Minute White Paper Bag Wreath
  • DIY Review: Handmade Wooden American Flag – Rustic, Patriotic, and Perfectly Imperfect
  • Modern House Free Quilt Pattern
  • Diamond Beanie – Crochet Pattern
  • Golden Peak Media Acquires CreativeBug
  • 13 Handmade Masculine Card Ideas
  • Create Your Own Stylish DIY Beach Bag: A Fun, Practical Craft
  • Stardew Valley Cross Stitch Patterns

Pick Your Blog

  • Sewing
  • Knitting
  • Quilting
  • Crochet
  • Home & Garden
  • Recycled Crafts
  • Scrapbooking
  • Card Making
  • Polymer Clay
  • Cross-Stitch
  • Edible Crafts
  • Felting
  • Glass Art
  • Indie Crafts
  • Kids Crafts
  • Jewelry Making
  • Lesson Plans
  • Needlework
  • Bath & Body
  • Party Ideas
  • Candle Making
  • DIY Weddings
  • Not Craft
  • Free Craft Projects

Copyright © 2025 · CraftGossip | Start Here | Contact Us | Link to Us | Your Editors | Privacy and affiliate policy