• Home
  • Suggest A Craft
  • DIY Newsletter

Recycled Crafts

Creative DIY Projects That Turn Trash Into Treasure

  • About CraftGossip
  • Our Network
    • Bath & Body Crafts
    • Candle Making Ideas
    • Crochet Ideas
    • Cross Stitch
    • Edible Crafts
    • Felting Patterns
    • Glass Art
    • Home & Garden Ideas
    • Indie Crafts
    • Jewelry Making
    • Kids Crafts
    • Knitting Patterns
    • Lesson Plans
    • Needlework
    • Party Ideas
    • Polymer Clay
    • Quilting Ideas
    • Recycled Crafts
    • Scrapbooking
    • Sewing Patterns
    • Card Making
    • DIY Weddings
    • Not Craft Ideas
  • Giveaways
  • Roundups
  • Store
  • Search

Giveaway- The Simple Simon Guide To Patchwork Quilting: Two Girls, Seven Blocks, 21 Blissful Patchwork Projects

July 25, 2017 by Stefanie Girard

Giveaway- The Simple Simon Guide To Patchwork Quilting: Two Girls, Seven Blocks, 21 Blissful Patchwork Projects

Leave a comment in today’s post by August 3rd, 2017 and you are in the running for this pretty quilting book.

Open to U. S. residents only please.

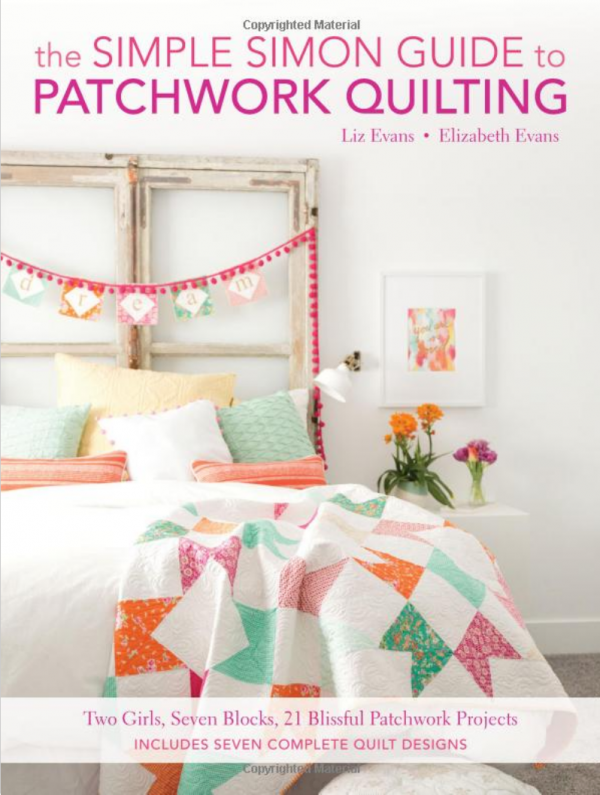
7 simply gorgeous quilts to complement any room!

Classic patchwork gets a modern makeover! In this sophisticated guide to quilting and sewing, popular Simple Simon and Company bloggers–and sisters-in-law–Liz Evans and Elizabeth Evans show you how to create traditional quilt blocks with a contemporary feel. Written with beginners in mind, The Simple Simon Guide to Patchwork Quilting invites you to get creative with step-by-step directions for making:

  • Bold, colorful quilts with graphic designs
  • Stunning skirts and accessories
  • Unique home decor, from whimsical wall art to a fabulous fabric basket that makes tidying up a treat
The Simple Simon Guide to Patchwork Quilting also includes tutorials on everything you’ll need to complete each project, from cutting fabric to attaching binding. Whether you’re new to quilting or simply looking for inspiration, you’ll love this stylish approach to a traditional patchwork.

Related Posts:

  • Collography: A new word for me and a great technique to try
  • The nuts and bolts of printing with nuts and bolts
«
»

Comments

  1. E G says

    July 27, 2017 at 12:44 pm

    I would love to win this book. You can never have too many quilting books. So much fun to make.

  2. ccurdncr says

    July 28, 2017 at 7:37 am

    I would love to win this book to give to my sister… 🙂

  3. Ann Marie Young says

    July 28, 2017 at 4:02 pm

    What an exciting opportunity to win this book. Would love to give it to my daughter who quilts for her Birthday. She would be thrilled. So would I. She might finally make me one, lol Thank you all for this contest. ?

  4. Suzanne Eastman says

    July 28, 2017 at 5:22 pm

    Pick me please!

  5. Judy Lipcsak says

    July 29, 2017 at 11:09 am

    I would love to add this book to my sewing library.

  6. Jill says

    July 29, 2017 at 1:02 pm

    My sister quilts the most beautiful things, she would love this book!

  7. Fireside Quilter says

    July 29, 2017 at 8:49 pm

    The book looks awesome!!

  8. Chris says

    July 31, 2017 at 12:59 am

    I could use this book for lots of my FQ’s laying around my sewing room.

  9. Lyz Covert says

    August 3, 2017 at 11:07 am

    Book cover makes you think of ‘where would I put this quilt?’ Love it

  10. Marilyn Nawara says

    August 11, 2017 at 8:54 pm

    I’ve been working on improving my quilting. I’ve done several simple designs on baby quilts, would like to expand to larger more complex designs/projects.

  11. Dawn says

    August 23, 2017 at 9:33 am

    I’m a senior citizen learning a new skill. Would appreciate any help I can get. LOL

  12. Bethany v Thompson says

    November 27, 2018 at 7:19 pm

    Looks like it’s time for me to start seriously quilting with this book!

« Older Comments

Have you read?

How to Paint Melamine Furniture

Recently, we received an email from Jenny, one of our readers, asking for some advice on painting melamine furniture. Jenny was looking to refresh an old dresser but wasn’t sure about the right way to tackle the project. Well, we’ve got just the thing! After some digging, we came across a fantastic article on Spraypaint Blog titled How to Recycle and Paint Melamine Furniture, which walks you through the process step-by-step.

Why This Article is Perfect for Jenny (and You!)

This guide is incredibly comprehensive, covering everything you need to know about painting melamine—an often tricky material to work with. Melamine is known for its smooth, glossy surface, which can be tough to paint without the right preparation. But with the tips from this article, you’ll learn how to properly prep your melamine pieces, choose the right paint, and achieve a professional-looking finish.

The article also dives into the importance of sanding and priming the surface to ensure that the paint adheres well. With these steps, Jenny (and anyone else trying this project) can be sure that their painted melamine furniture will not only look great but last for years to come.

Jenny, we hope this article gives you all the info you need to tackle your melamine furniture project! It’s clear from the tutorial that a little prep work goes a long way, and with the right products, even melamine can be transformed into a beautiful, personalized piece.

For anyone else curious about painting melamine, check out the full article on Spraypaint Blog for all the tips and techniques: How to Recycle and Paint Melamine Furniture. Happy painting!

My Tips for Painting Melamine Furniture

Hey Jenny (and anyone else planning a melamine project), here are my top tips to help you get the best results when painting melamine furniture:

Prep is Key
Clean the surface well, then lightly sand it with fine-grit sandpaper to give the primer something to grip onto. Trust me, it makes a big difference!

Prime Like a Pro
Don’t skip the primer! Use a bonding primer that’s made for glossy surfaces or melamine. It’ll make sure your paint sticks and lasts.

Pick the Right Paint
Go for a good enamel or acrylic paint. I use a foam roller for a smooth finish—no brushstrokes! Apply a few thin coats, letting each one dry in between.

Topcoat for Durability
Once the paint’s dry, apply a protective topcoat (polyurethane or polycrylic) to help it stay scratch-free.

Give It Time
Let the paint cure for at least 48 hours before using the furniture—longer is even better! It’ll help the finish hold up over time.

Get Creative
Don’t be afraid to try fun colors or finishes! Melamine is perfect for getting a bit adventurous.

Explore

books Christmas CraftGossip Giveaways Craft Inspirations Easter glass halloween Home Decor kid crafts mason jar More Crafts Patterns & Tutorials recycled art Recycled Clothing Recycled Jewelry Recycled Sewing Recycled Tutorials Recycling Ideas Recycling Organizing tin can

RSS More Articles

  • Etsy Spotlight: 1955 Baby Doll Nightgown & Bloomers Pattern
  • Baby Banner and Mini Album Project
  • How to Paint Melamine Furniture
  • Color Wheel Block Tutorial by Red Pepper Quilts
  • How to make a Summer Wreath with Hydrangeas
  • 18 FREE Labubu Coloring Pages and Digital Images
  • How to Make the Perfect Little Baker’s Apron for Kids: A Fun Sewing Project
  • Mr Fox Toy Crochet Pattern
  • 5 Genius Tips to Keep Your New Home Clutter-Free from Day One
  • All About Stitching on Perforated Paper

Pick Your Blog

  • Sewing
  • Knitting
  • Quilting
  • Crochet
  • Home & Garden
  • Recycled Crafts
  • Scrapbooking
  • Card Making
  • Polymer Clay
  • Cross-Stitch
  • Edible Crafts
  • Felting
  • Glass Art
  • Indie Crafts
  • Kids Crafts
  • Jewelry Making
  • Lesson Plans
  • Needlework
  • Bath & Body
  • Party Ideas
  • Candle Making
  • DIY Weddings
  • Not Craft
  • Free Craft Projects

Copyright © 2025 · CraftGossip | Start Here | Contact Us | Link to Us | Your Editors | Privacy and affiliate policy