• Home
  • Suggest A DIY
  • DIY Newsletter

Recycled Crafts

Creative DIY Projects That Turn Trash Into Treasure

  • About CraftGossip
  • Our Network
    • Bath & Body Crafts
    • Candle Making Ideas
    • Crochet Ideas
    • Cross Stitch
    • Edible Crafts
    • Felting Patterns
    • Glass Art
    • Home & Garden Ideas
    • Indie Crafts
    • Jewelry Making
    • Kids Crafts
    • Knitting Patterns
    • Lesson Plans
    • Needlework
    • Party Ideas
    • Polymer Clay
    • Quilting Ideas
    • Recycled Crafts
    • Scrapbooking
    • Sewing Patterns
    • Card Making
    • DIY Weddings
    • Not Craft Ideas
  • Giveaways
  • Roundups
  • Store
  • Search

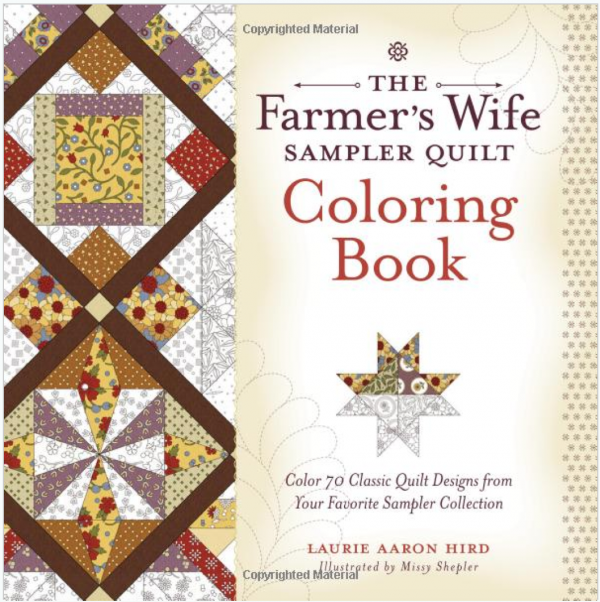
Giveaway-The Farmer’s Wife Sampler Quilt Coloring Book

March 9, 2016 by Stefanie Girard

Screen Shot 2016-03-09 at 7.53.56 AM

Giveaway-The Farmer’s Wife Sampler Quilt Coloring Book

Leave a comment in today’s post by March 18, 2016 and you are in the running for this fun coloring book based on quilt blocks.

Open to U. S. residents only please.

“When quilting meets coloring, beautiful things happen!

The nostalgic beauty of Laurie Aaron Hird’s bestselling Farmer’s Wife Sampler Quilt series has been captured in this commemorative coloring book designed around time-honored blocks and inspired fabric motifs. Laurie’s traditional blocks, inspired by actual letters from 1920s and 30s farm wives, give quilters a glimpse into this country’s rural roots and commemorate the strength and hope of women of the Great Depression. These coloring pages depict many of the same beautiful blocks reinterpreted in line-art illustrations, creating coloring pages to delight quilt-lovers everywhere. Also included are 7 patchwork designs that capture the American quilting spirit. The perforated pages include highly detailed fabric designs to color, offering you the simple joy of creative expression.”

Coloring in sheets are a great way to calm the busy mind, as you focus on the coloring techniques your brain is actually able to calm itself and focus on less. Coloring is used to help relax and calm anxiety and stress. Coloring keeps out mental health in check and allows us to develop of creative brain. We highly recommend Copic markers or Faber castell coloring pencils .
«
»

Comments

  1. P.J. Miller says

    March 9, 2016 at 4:54 pm

    I would love to win this! I have the Farmer’s Wife 1930’s Sampler book and have started making blocks with 1930’s reproduction fabric – all paper pieced. Whew!

  2. Sylvia says

    March 9, 2016 at 5:03 pm

    I started coloring again at the age of 73! I would like to try my hand at coloring quilts, too. Thank you for this unique opportunity!

  3. yarnaddicted says

    March 9, 2016 at 5:12 pm

    I would love to enter for this awesome coloring book!
    Thanks, Kim Reid

  4. Maria Shiyou says

    March 9, 2016 at 5:46 pm

    Love coloring books!

  5. Lee says

    March 9, 2016 at 6:58 pm

    I love the farmers wife quilt book – this would be fun! thanks!

  6. Nancy P says

    March 9, 2016 at 7:19 pm

    I have been using coloring pages when working with a youth group and have come to enjoy coloring myself. I would love to color quilt patterns

  7. Theresa says

    March 9, 2016 at 7:48 pm

    Thanks for much for the chance to win a fun book.

  8. Kim says

    March 9, 2016 at 7:53 pm

    That would be awesome to win !

  9. Julie Henderson says

    March 9, 2016 at 8:05 pm

    This is such a great meeting of 2 creative pastimes!! I would be over the moon to win this lovely book…thanks much for the great giveaway! Blessings to all. 🙂

  10. Cath Taylor says

    March 9, 2016 at 8:56 pm

    I’m so tickled that coloring books have become trendy. I remember when my son was a preschooler, some twenty years ago, I loved to sit and color with him. I even wrote to a cousin and expressed my delight, then felt foolish that I’d written that to her. Now I can come out of the closet!! This book looks especially delightful. And boy, after a frustrating struggle with taxes today, I need this.

  11. Stephanie says

    March 9, 2016 at 9:49 pm

    Wow! Sweet!

  12. Kathy Eckman says

    March 9, 2016 at 10:15 pm

    I love quilts, and coloring, so I would love to win!

  13. estracener says

    March 9, 2016 at 10:25 pm

    This looks great! Would love to win one!

  14. J Stout says

    March 9, 2016 at 11:40 pm

    I love quilts and I love history! What fun this would be.

  15. Ashley Renee Cancienne says

    March 10, 2016 at 12:48 am

    This would be great! Even just to get color ideas for almost any craft. I have a hard time getting colors together that do not clash, so this would definitley be great practice!

  16. MelodyJ says

    March 10, 2016 at 3:31 am

    Think of all the color combos that can be used in that book.

  17. Angie Quinn says

    March 10, 2016 at 6:58 am

    The perfect marriage…coloring pages and quilts. A book to be savor end. Thanks for offering this giveaway.

  18. vickie westermeyer says

    March 10, 2016 at 9:42 am

    I adore quilts so this would be doubly fabulous. relaxing and quilts!!

  19. Shelly says

    March 10, 2016 at 10:47 am

    I love the Farmer’s Wife sampler quilts. This would be a fun coloring book and would be great for planning quilt color schemes.

  20. Sherry Jagels says

    March 10, 2016 at 12:31 pm

    I love to color and I love to quilt! what a great giveaway !!! thanks.

  21. Joyce says

    March 10, 2016 at 1:28 pm

    Sounds like a lot of fun to me!!

  22. Mary says

    March 10, 2016 at 2:28 pm

    What a beautiful book, quilt patterns and coloring, great fun.
    Thanks so much.

  23. Lee Seroka says

    March 10, 2016 at 4:23 pm

    Oh what fun that one would be!

  24. Kathy Roberts says

    March 10, 2016 at 4:44 pm

    How interesting! To color and see all different quilt blocks, what a great idea!

  25. Denise Jordan says

    March 10, 2016 at 6:54 pm

    I started coloring after I retired from teaching elementary school. I love it????

  26. Karen Wilson (Crafty Commons) says

    March 10, 2016 at 10:03 pm

    I loved coloring even before it was popular for adults. This would be wonderful! Thanks for the opportunity to win.

  27. Angie Peele says

    March 10, 2016 at 10:20 pm

    I would love yo have this coloring book. What a way to relax but to color your favor hobby..quilting

  28. Linda M says

    March 10, 2016 at 10:25 pm

    Oh my goodness…coloring and quilting combined. Can’t get any better than that!

  29. Denise Bryant says

    March 10, 2016 at 11:11 pm

    Looks like a fabulous coloring book! I’d share it with my Aunt Betty, who loves to color.

  30. Gail says

    March 11, 2016 at 5:02 pm

    Me! Me!!!!!! Me!!!!!!!!!!!!!!!!!!!!!

  31. Judy Cornell says

    March 11, 2016 at 9:41 pm

    What a great idea for a coloring book. I love both coloring and quilting!

  32. Suzy says

    March 12, 2016 at 10:45 am

    I moved to a small farm in the UP last summer. We did raise two pigs and have chickens and ducks for eggs. There was alot of cleanup and garden prep so our garden was small. This year is going to be bigger and better. I also decorate cakes and cookies and sew when I have the time. I want to design our own barn quilt for the farm. Perhaps I’ll get some inspiration while coloring in the book.

  33. Carmen N says

    March 13, 2016 at 8:59 pm

    I love coloring books – and vintage styled quilt patterns; what a great combination!

  34. Debbie Peek says

    March 14, 2016 at 10:20 am

    I surely would love to win this book. I have the companion book The 1930’s sampler Quilt Book and also the Farmer’s wife Pony Club Sampler Quilt. The coloring book would complete my collection.

  35. Donna Coffin says

    March 14, 2016 at 6:06 pm

    This looks like so much fun!! ;^)

  36. chickie brewer says

    March 15, 2016 at 11:46 am

    The book is beautiful and it would be so much fun to color in it!

  37. Jessica says

    March 17, 2016 at 7:50 pm

    Oh, this looks lovely. I’d love to win. Thank you for sponsoring such a fun giveaway! 🙂

« Older Comments

Have you read?

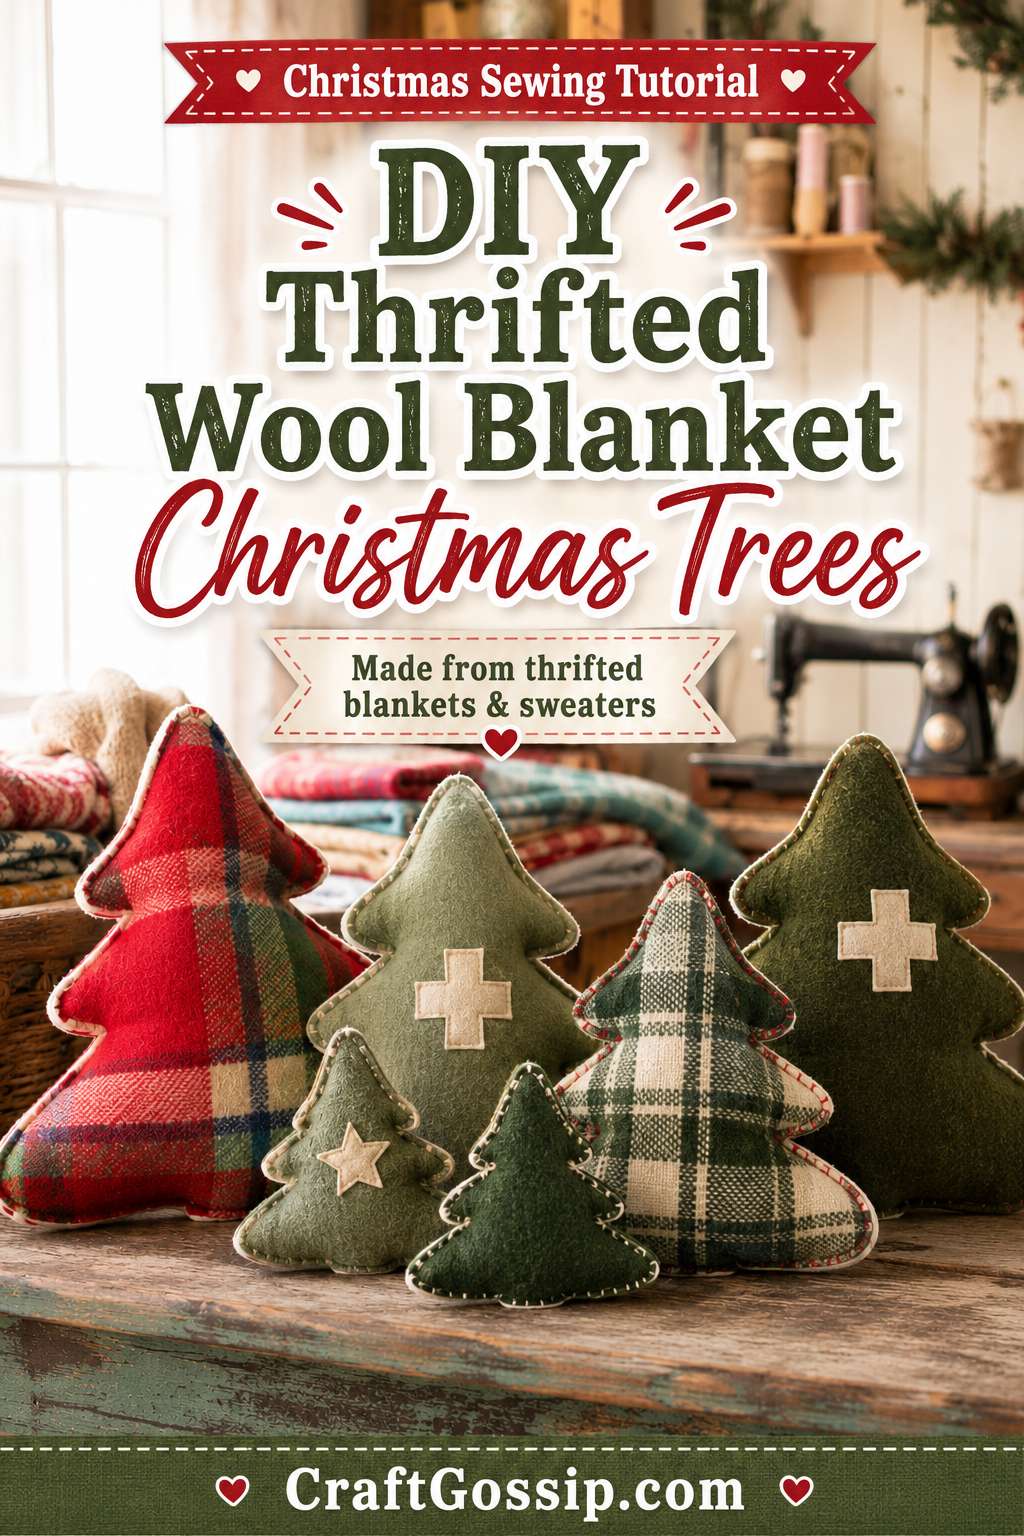
DIY Thrifted Wool Blanket Christmas Trees

There is something wonderfully cosy about Christmas decorations made from old wool blankets and felted sweaters. The slightly faded checks, worn edges and mismatched colours give these stuffed Christmas trees the sort of character you simply cannot buy new.

They are also a brilliant way to rescue damaged wool blankets, shrunken jumpers and thrift-store sweaters that are too good to throw away but perhaps a little too holey to wear. We all have at least one jumper that went into the washing machine as an adult size and came out suitable for a mildly chilly teddy bear.

These handmade fabric Christmas trees can be made in several sizes and displayed along a mantel, arranged in a basket, stacked on a bench or sold at Christmas craft fairs. Make them from traditional red and green tartan, muted vintage wool, soft pastel blankets or neutral greys for a more Scandinavian farmhouse look.

 CraftBits already has a felt Christmas stacking tree tutorial, but that design is made from separate layered pieces rather than a stuffed tree-shaped cushion. CraftGossip has also featured recycled sweater Christmas ornaments, and our roundup of 25 clever things to make with sweaters that shrunk in the wash includes plenty of ideas for using felted knitwear. This larger stuffed Christmas tree version is different enough to work as a full standalone tutorial.

What You Will Need

  • Thrifted wool blanket, wool coat, felted sweater or heavy woven fabric
  • Paper for making the Christmas tree template
  • Ruler and pencil
  • Fabric scissors or rotary cutter
  • Cutting mat
  • Sewing clips or sturdy pins
  • Sewing machine
  • Strong polyester sewing thread
  • Polyester fibre fill, wool stuffing or clean fabric scraps
  • Hand-sewing needle
  • Optional contrasting fabric for the back
  • Optional piping cord or ready-made piping
  • Optional buttons, patches, embroidery thread, bells or ribbon
  • Optional lavender, dried cloves or cinnamon for scent

A sharp pair of dressmaking scissors will make cutting thick wool much easier. A rotary cutter and self-healing cutting mat are also useful, particularly when making several trees for a market stall. These are easy supplies to source through Amazon, along with stuffing, piping cord and heavy-duty sewing needles.

Choosing The Best Wool Blankets And Sweaters

Look for wool blankets with interesting checks, stripes, ombré shading or slightly faded colours. Small holes and worn sections are not necessarily a problem because you can position your template around them.

For sweaters, choose garments with a high wool content. Pure wool and wool-rich blends felt particularly well, while acrylic sweaters may stretch, unravel or remain very floppy.

Before cutting into a sweater, felt it in the washing machine. This causes the fibres to shrink together, creating a dense fabric that is much easier to cut and sew.

How To Felt A Wool Sweater

Place the sweater in a hot wash with a small amount of laundry detergent. Adding an old towel or pair of jeans creates extra agitation.

Wash on a warm or hot cycle, then tumble-dry on medium or high heat. Repeat if necessary until the fabric feels thick and the knitted stitches are difficult to separate.

Do not use this method on a precious jumper you hope to wear again. Felting is permanent, which is precisely why it works so well for upcycled sweater crafts.

For more ideas once you have felted a jumper, save our guide to things you can make from accidentally shrunken sweaters.

Wash And Prepare Thrifted Wool

Always clean thrifted fabric before sewing, particularly when the finished trees will be displayed indoors or given as gifts.

Check the care label first. Many wool blankets should be hand-washed or washed on a gentle wool cycle.

Wash with cool water and wool-safe detergent, then press out excess water without wringing. Roll the blanket in a towel and lay it flat to dry.

If the blanket has a musty smell, air it outside in a shaded spot before washing. Avoid leaving coloured wool in strong sunlight for long periods because it may fade.

Inspect the fabric carefully for moth damage. Small isolated holes can be avoided or covered with a decorative patch, but heavily affected fabric is best discarded.

Make A Christmas Tree Template

The easiest template is a simple symmetrical tree silhouette with three gently rounded branch tiers.

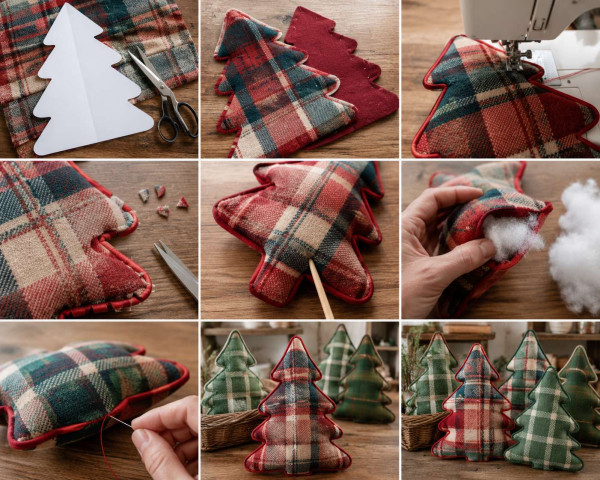
Fold a large sheet of paper in half vertically. Draw half a Christmas tree against the folded edge, beginning with a narrow tip and widening toward the base.

For a medium tree, try these finished dimensions:

  • Height: approximately 45 cm or 18 inches
  • Width at the base: approximately 35 cm or 14 inches
  • Trunk width: approximately 8 cm or 3 inches

Cut through both layers and unfold the paper. Folding the template ensures both sides match, even when your freehand drawing has had one of those slightly wobbly crafting moments.

Add a 1 cm or 3/8-inch seam allowance around the entire template if it is not already included.

You can also make a group of three trees measuring approximately 30 cm, 40 cm and 50 cm tall.

Cutting The Fabric

Place the template over the most attractive part of the blanket or sweater.

With plaid fabric, take a moment to position the pattern deliberately. A diagonal tartan can look particularly striking, while centred stripes create a neat, traditional finish.

Cut two matching tree shapes:

  • Two pieces from the same fabric, or
  • One wool front and one plain wool or sturdy cotton back

If using a sweater, avoid cutting directly through bulky side seams, ribbed waistbands or thick neckbands unless you want those details to become part of the design.

Mark a 10–12 cm opening along the lower side or base for turning and stuffing.

Optional: Add Piping

The red piping around the inspiration tree gives the project a beautifully finished, almost vintage cushion-like appearance.

Pin or clip piping around the right side of the front tree piece, aligning the raw edge of the piping tape with the raw edge of the wool.

At inward corners between the branches, snip into the piping tape—but not through the cord—so it bends smoothly.

Baste the piping in place using a zipper foot.

When you reach the end, overlap or neatly join the piping tails. Do not worry if this takes a little fiddling. Piping behaves beautifully right up until the moment it reaches a tight Christmas tree corner and decides to test your patience.

A contrasting blanket-stitch edge is a lovely alternative when you do not want to add piping.

Sewing The Christmas Tree

Place the two tree pieces right sides together.

Pin or clip securely around the edges. Clips are often easier than pins when working with thick felted wool.

Sew around the tree using a 1 cm or 3/8-inch seam allowance, leaving the marked opening unstitched.

Use a slightly longer stitch length of around 3 mm for thick wool. Sew slowly around the branch points and pivot with the needle down.

Backstitch at both ends of the opening.

Clip The Curves And Corners

Trim excess bulk from the outer points without cutting through the stitching.

Clip small notches into the inward curves between each branch tier. This allows the fabric to spread properly when turned.

Do not cut too close to the seam. Leave several millimetres of fabric between each clip and the stitching line.

Turn And Shape The Tree

Turn the tree right side out through the opening.

Use a blunt turning tool, knitting needle or wooden chopstick to ease out the top, branch tips and trunk corners. Avoid pushing too forcefully, particularly if the wool is loosely woven.

Press lightly with steam, using a pressing cloth to protect the wool. Do not flatten the tree completely; you only need to smooth the seams.

Stuff The Tree

Begin by pushing small pieces of stuffing into the very top and each branch point.

Continue filling gradually, alternating from side to side. Small handfuls create a smoother result than forcing in one enormous bundle.

Keep the tree soft enough to look relaxed but firm enough to stand or hold its shape. The examples have a charming, slightly plump cushion appearance rather than being stuffed rock-hard.

For a heavier base, place a small fabric pouch filled with dried rice or plastic craft pellets inside the lower trunk before adding the remaining stuffing. This helps smaller trees stand upright.

Do not use loose rice if the tree will be stored somewhere damp or exposed to pests. Seal it securely inside a double-layered pouch.

Add A Christmas Scent

For scented Christmas trees, mix a small amount of dried lavender, whole cloves or broken cinnamon sticks into the stuffing.

Place the fragrant ingredients inside a small muslin bag so the pieces do not work their way through the wool.

You could also add several drops of Christmas fragrance oil to a cotton pad, allow it to dry completely and tuck it inside the tree. Avoid applying oil directly to vintage wool because it may stain.

Close The Opening

Fold the raw edges of the opening inward.

Close with a ladder stitch using strong coordinating thread. Pull each stitch gently so the seam disappears into the wool.

Knot securely and bury the thread tail inside the tree.

Decorative Variations

Scandinavian Grey Trees

Use charcoal, oatmeal and soft grey wool blankets. Add simple white felt crosses, stars or hand-stitched lines.

Vintage Tartan Trees

Combine red, green, navy and cream plaid blankets. Finish the edges with red piping for a cheerful traditional Christmas look.

Pastel Wool Trees

Use pale aqua, blush pink, sage and cream. These are lovely for softer cottage-style Christmas decorating.

Patchwork Trees

Piece smaller sweater scraps together before cutting the tree shape. Press each seam flat and place the finished template over the patchwork panel.

Blanket-Stitched Trees

Sew the trees wrong sides together and leave the seam exposed. Finish around the edge with chunky blanket stitch using embroidery thread or wool yarn.

Memory Blanket Trees

Use a damaged family blanket, old school jumper or sentimental wool coat. These make especially meaningful handmade Christmas keepsakes, provided everyone is genuinely ready for the original item to be cut. It is worth asking before enthusiastically transforming Grandpa’s favourite blanket into festive shrubbery.

Making Them For Christmas Craft Fairs

These stuffed wool Christmas trees would work beautifully as a small coordinated collection.

Offer three sizes and a few colour palettes rather than making every tree completely different. Customers often like buying them in sets.

Batch production makes the process much quicker:

  1. Prepare all fabric.
  2. Cut every tree.
  3. Add piping to all fronts.
  4. Sew the trees in one session.
  5. Turn and stuff them together.
  6. Hand-sew the openings while watching something suitably festive.

Add a tag explaining that each tree is handmade from rescued wool blankets or felted sweaters. The upcycled story is part of the charm.

Smaller versions can also be turned into hanging Christmas ornaments by catching a loop of ribbon in the top seam before sewing.

A Few Troubleshooting Tips

The Sweater Fabric Is Stretching

It may not be felted enough. Felt it again or apply lightweight woven fusible interfacing to the wrong side before cutting.

The Branch Points Look Blunt

Trim the seam allowance closer at the outer points and push them out carefully with a blunt tool.

The Inward Corners Are Pulling

Add another small clip toward the seam, taking care not to cut the stitches.

The Tree Looks Lumpy

Remove some stuffing and refill using smaller pieces. Pay particular attention to the branch tips before filling the centre.

The Tree Will Not Stand

Add a weighted pouch to the base, make the trunk wider or display it leaning against other trees in a basket.

These thrifted wool blanket Christmas trees are the sort of decorations that look better when they are not perfectly identical. A slightly crooked branch, faded section of plaid or visible hand stitch only adds to their handmade charm.

They are cosy, practical and wonderfully forgiving—and they use the very wool blankets and sweaters that often sit neglected at the back of thrift stores. Make one as a festive cushion, create a trio for the mantel or start a small production line for your Christmas market table. Just be warned: once you begin spotting old plaid blankets as potential Christmas trees, no op shop linen shelf will ever be safe again.

Explore

books Christmas CraftGossip Giveaways Craft Inspirations Easter glass halloween Home Decor kid crafts More Crafts Patterns & Tutorials Recycled and Thrifted Ideas recycled art Recycled Clothing Recycled Jewelry Recycled kids crafts Recycled Sewing Recycling Ideas Recycling Organizing tin can

Featured Posts

R2-D2 Hanukkah dreidel (or droidel) download

How to make recycled magazine butterfly art

How to make cupcake paper angels

Driftwood Paper weights or Halloween Decorations

Book Review – Upcycling: 20 Creative Projects Made from Reclaimed Materials

RSS feed: More Articles More Articles

  • Book Review: The Festival of Lights
  • My Favorite Things Knitwear Review: Is This Pattern Website Worth Browsing?
  • DIY Thrifted Wool Blanket Christmas Trees
  • DIY Christmas Cherry Body Scrub
  • 3 FREE Dark Academia Coloring Pages
  • Designer Spotlight: Stitching Housewives
  • Easy Projects to Knit with a Square (or Two)
  • 10 Colorful Halloween Scrapbook Layout Ideas
  • Ghost Poop Marshmallow Bags With a Free Printable Halloween Topper
  • Knit Picks Friends & Family Sale: Save 20% on Your Next Knitting Project

Copyright © 2026 · CraftGossip | Start Here | Contact Us | Link to Us | Your Editors | Privacy and affiliate policy