• Home
  • Suggest A DIY
  • DIY Newsletter

Recycled Crafts

Creative DIY Projects That Turn Trash Into Treasure

  • About CraftGossip
  • Our Network
    • Bath & Body Crafts
    • Candle Making Ideas
    • Crochet Ideas
    • Cross Stitch
    • Edible Crafts
    • Felting Patterns
    • Glass Art
    • Home & Garden Ideas
    • Indie Crafts
    • Jewelry Making
    • Kids Crafts
    • Knitting Patterns
    • Lesson Plans
    • Needlework
    • Party Ideas
    • Polymer Clay
    • Quilting Ideas
    • Recycled Crafts
    • Scrapbooking
    • Sewing Patterns
    • Card Making
    • DIY Weddings
    • Not Craft Ideas
  • Giveaways
  • Roundups
  • Store
  • Search

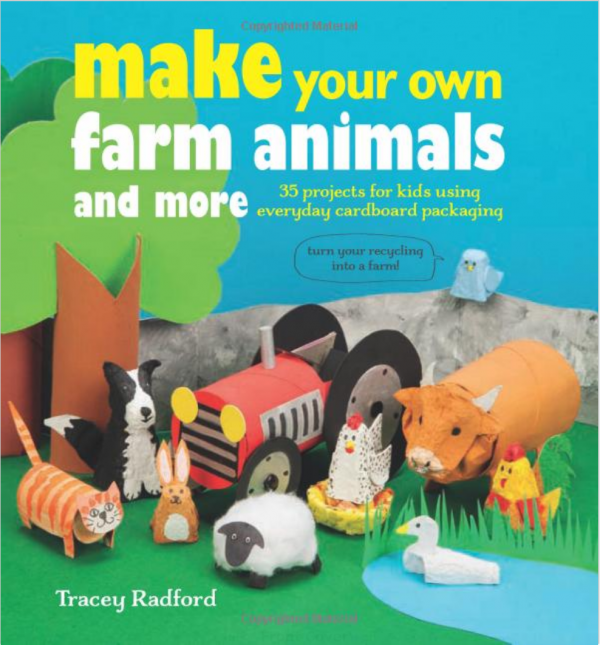
Make Your Own Farm Animals and More: 35 projects for kids using everyday cardboard packaging

March 21, 2017 by Stefanie Girard

If you’re looking for a delightful and eco-friendly crafting adventure for kids, Make Your Own Farm Animals and More by Tracey Radford is a fantastic choice. This book offers 35 creative projects that transform everyday cardboard packaging into charming farm animals and scenery, making it perfect for young crafters and their families.

Tracey Radford, also known for her work on , brings her signature style to this collection, providing clear, step-by-step instructions accompanied by helpful tips. The projects are designed to be accessible, requiring only common household items like egg cartons, cereal boxes, and cardboard tubes. Children can create a variety of farm animals, including cows, horses, pigs, and even a tractor, fostering both creativity and sustainability.

Reviewers have praised the book for its engaging content and ease of use. One reader noted, “The instructions are very easy to follow and the wonderful photographs help even the worst crafter!” Another mentioned, “Inexpensive to make with such clever use of otherwise discarded household items, this is a must for children’s parties, projects, and holiday times.”

Overall, Make Your Own Farm Animals and More is a wonderful resource for parents and educators seeking fun, sustainable craft projects. It’s an excellent way to engage children in hands-on activities that promote recycling and imaginative play.
«
»

Comments

  1. Rose says

    March 21, 2017 at 4:27 pm

    Hi! Looks like a great book. I’m in the UK and not sure if I can enter. Hope so!

  2. Zil says

    March 21, 2017 at 6:02 pm

    I would love to own this book to use with little ones. Thank you for the giveaway chance.

  3. Karen Wilson says

    March 21, 2017 at 6:41 pm

    This would be great for my granddaughters. Thanks for the chance to win!

  4. Leanne Stokes says

    March 21, 2017 at 11:09 pm

    Ohh this would be a great gift fot my MIL for the playgroup she runs, she is always on the lookout for craft ideas!

  5. Sarah says

    March 22, 2017 at 8:37 am

    Absolutely adorable! This fits my daughter’s twin obsessions with animals and cardboard boxes perfectly! 🙂

  6. shari harniss says

    March 22, 2017 at 9:28 am

    Cute book! Thanks for the chance to win.

  7. Amie says

    March 23, 2017 at 11:17 am

    What a cool book. I work at a library and that would be a fun project for kids to do after a farm themed storytime!

  8. Kimberly D. says

    March 23, 2017 at 11:46 am

    Looks like a fun project for both children and adults!

  9. Barb Macaskill says

    March 23, 2017 at 12:00 pm

    My 4 year old granddaughter and I could create a whole barnyard of animals with this fun book! Fingers crossed and thanks for the chance to win this book!

  10. Linda says

    March 23, 2017 at 12:17 pm

    I would love a chance to win this fun book!

  11. martha donley says

    March 23, 2017 at 5:40 pm

    As a former elementary art teacher all I can say is this book looks great, wish I had it sooner’

  12. Kathy Linker says

    March 24, 2017 at 8:28 am

    What wonderfully creative ideas. Our Library kids want to check this out!

  13. Lori Parker says

    March 24, 2017 at 11:41 am

    Oh I love the looks of this book. Lots of great projects for the grandkids. I love …..the tractor.

  14. Merna says

    March 24, 2017 at 12:20 pm

    Would love this book to make with my grandchildren. It looks so fun.

  15. Mary says

    March 24, 2017 at 2:33 pm

    What a great book, looks like so much fun. My nephew would love to make all those animals. Thank you.

  16. Evelyn Carlson says

    March 24, 2017 at 9:44 pm

    This book is just darling. I would make the projects and put them in my grandma hope chest for when I finally have grandchildren,

  17. logforkids says

    March 24, 2017 at 9:48 pm

    The Border Collie looks like our Martha Bones! <3

  18. Nancy says

    March 25, 2017 at 11:52 am

    Just too cute!

  19. Mary Helene says

    March 25, 2017 at 1:01 pm

    Wonderful book for my grand kids.

  20. Deborah W says

    March 25, 2017 at 10:27 pm

    I would love to win this to work on some of these projects with my grandchildren.

  21. Christine says

    March 13, 2020 at 12:22 pm

    Looks like a fun book. My grandson loves animals and would have a ball making and playing with these animals!

Have you read?

DIY Sea Glass Planter: A Coastal Terracotta Pot Makeover

There is something about sea glass that makes every crafter a little bit feral at the beach. You start off casually walking along the sand, and before you know it, you’re bent over like a treasure hunter, filling your pockets with tiny frosted bits of blue, green, white, and brown glass while pretending this is “just a relaxing walk.”

This DIY sea glass planter is a lovely way to turn those beach finds into something useful and pretty for your home. It takes a plain terracotta pot and gives it a coastal mosaic-style makeover using sea glass, glue, and air-dry clay or grout-style filler. The finished pot looks beautiful with succulents, herbs, trailing greenery, or even a faux plant if you are blessed with the opposite of a green thumb.

It is a perfect summer craft, beach house decor project, handmade gift idea, or weekend craft for anyone who loves coastal decorating. And if you don’t have a jar of real sea glass tucked away from holidays past, you can absolutely use craft-store sea glass, tumbled glass, flat glass vase filler, or even broken pottery pieces for a recycled twist.

If you enjoy coastal-inspired crafts, you might also like this Dollar Tree beach shell nautical planter over on CraftBits, or this pretty recycled china and sea glass angel project if you have odd pieces of pottery waiting for their second life.

Why Make A Sea Glass Planter?

A sea glass planter is one of those crafts that looks far more expensive than it actually is. Once the glass is attached and the gaps are filled, the pot has that lovely handmade mosaic look without needing proper tile-cutting tools or complicated grout work.

It is also a sweet memory craft. You can use sea glass collected from a holiday, a favourite beach walk, or a special family trip. Every little piece becomes part of the story, which is much nicer than leaving it sitting in a jar on a shelf for the next ten years. Not that I would ever do that, obviously.

This project works well for:

Coastal home decor
Beach house styling
Summer patio decorating
Succulent planters
Handmade housewarming gifts
Mother’s Day gifts
Garden club craft days
Upcycled terracotta pot projects
Memory crafts using collected beach finds

Supplies You Will Need

Plain terracotta pot
White outdoor paint or chalk-style outdoor paint
Paintbrush
Sea glass, tumbled glass, or flat glass vase filler
Strong adhesive suitable for glass and terracotta
Air-dry clay, tile grout, or outdoor filler
Clay tool, craft stick, or old butter knife
Damp cloth or sponge
Clear outdoor sealer
Disposable gloves
Small plant, succulent, herb, or faux greenery

A good strong craft adhesive makes a big difference here. Hot glue is not the best choice for this project because it can loosen, especially if the planter gets warm or damp. Look for a glue designed for glass, ceramic, terracotta, or mixed surfaces. E6000-style adhesive or a strong outdoor craft glue is usually a better option.

For supplies, Amazon is handy for craft sea glass, outdoor sealers, terracotta pots, and strong adhesives. If you want a more unusual colour mix, Etsy can also be a lovely place to find small batches of tumbled sea glass or recycled glass pieces from independent sellers.

Before You Start

Wash and dry your terracotta pot before painting. Terracotta can be dusty, and that powdery surface can stop paint and glue from bonding properly.

If your sea glass has sand or salt on it, give it a rinse and let it dry completely. Real sea glass is beautiful, but it is not always perfectly flat, so take a few minutes to sort your pieces by size before gluing. The flatter pieces are easiest to use around the main body of the pot, while smaller odd-shaped pieces are useful for filling gaps near the rim and base.

You may also want to do a quick layout test before gluing anything down. This saves you from the classic crafter’s mistake of using all the best blue pieces in the first five minutes and then being left with twelve awkward brown bits and regret.

Step One: Paint The Terracotta Pot

Paint the outside of your terracotta pot with white outdoor paint. You can also paint the inside rim if it will be visible once the plant is added.

White is a good base colour because it helps the sea glass colours look fresh and bright, especially pale aqua, green, and frosted white pieces. If you want a moodier coastal look, you could use soft grey, sandy beige, muted blue, or even a pale seafoam green.

Apply two thin coats rather than one thick coat. Let the paint dry fully between coats.

If this planter will be used outdoors, make sure the paint is suitable for exterior use. Terracotta absorbs water, so proper paint and sealing help your finished planter last longer.

Step Two: Plan Your Sea Glass Layout

Lay your sea glass pieces out on the table and sort them roughly by colour and size.

You can create a random beachy mosaic, arrange the colours in soft rows, make an ombre effect from darker blue to pale aqua, or keep it simple with mixed frosted glass all over.

For a more polished look, leave a small gap between each piece so the filler can show through like grout. If the pieces are too close together, it becomes harder to press the air-dry clay or filler neatly between them.

If you like garden projects and handmade planters, you might also enjoy this simple cement plant pot tutorial for a more industrial-style handmade planter.

Step Three: Glue The Sea Glass To The Pot

Place the pot on its side and start gluing the sea glass pieces onto the outside surface.

Work in small sections at a time. Add a dab of glue to the back of each piece of sea glass, press it onto the pot, and hold it for a few seconds until it grips. Rotate the pot as needed, allowing one section to set before moving too quickly to the next.

Start around the middle of the pot and work outward. This helps you build a balanced design without everything sliding toward the base.

Do not rush this step. Sea glass can be slippery, and terracotta pots are curved, which means some pieces will try to wander off like they have somewhere better to be. Let the glue dry properly before moving on to filling the gaps.

Step Four: Fill The Gaps

Once the sea glass is firmly attached and the glue has dried, it is time to fill the gaps.

You can use air-dry clay for a soft handmade look, or tile grout/outdoor filler for a more traditional mosaic finish. Air-dry clay is easy to work with and beginner-friendly, while grout tends to be more durable if the planter will live outdoors.

If using air-dry clay, roll small pieces into thin snakes and press them into the gaps between the sea glass. Use your fingers, a clay tool, craft stick, or old butter knife to smooth the clay around the pieces.

If using grout or filler, apply it carefully according to the product directions, pressing it between the glass pieces and wiping away excess from the surface before it sets.

Keep a damp cloth nearby and gently clean the tops of the sea glass as you go. It is much easier to wipe it while the filler is still soft than to scrape it off later.

Step Five: Smooth And Clean The Surface

Once the gaps are filled, go over the whole planter and smooth any rough areas.

Use a damp sponge or cloth to clean the sea glass pieces so they shine through clearly. Be gentle. You do not want to lift the filler out of the gaps.

Check around the top rim and bottom edge of the pot. These areas often need a little extra tidying because they are the places most likely to look messy if the glass pieces are uneven.

Let the planter dry completely. Air-dry clay may need a full day or more depending on thickness and humidity. Grout and outdoor filler will have their own drying and curing times, so follow the instructions on the packaging.

Step Six: Seal The Finished Planter

For indoor decorative use, sealing is helpful but not always essential. For outdoor use, sealing is strongly recommended.

Use a clear outdoor sealer suitable for terracotta, clay, or mosaic-style crafts. Apply it lightly and evenly, making sure the filler and painted areas are protected.

Avoid sealing the inside of the pot if you are planting directly into it unless the sealer is plant-safe. An easy option is to keep your plant in a plastic nursery pot and sit it inside the decorated planter. That way the sea glass pot acts more like a decorative cover, and you do not have to worry as much about soil, drainage, or water damage.

What Plants Work Best?

Succulents look especially pretty in a sea glass planter because they suit the coastal look and do not need heavy watering. Small trailing plants also look gorgeous because they soften the edges of the pot.

Good options include:

Succulents
Small cactus plants
Trailing string of pearls
Baby tears
Small herbs
Faux greenery
Air plants in a small insert pot

If you are gifting the planter, a faux succulent is a safe choice. Nobody wants to give a handmade gift that comes with plant-parent pressure.

Tips For A Better Finish

Use flatter sea glass pieces where possible. They attach more easily and sit better on the curved pot.

Avoid very thick glass pieces near the bottom edge or the pot may not sit flat.

Let the glue dry fully before filling the gaps. If the glass shifts while you are adding clay or grout, the finished surface can look uneven.

Use outdoor paint and sealer if the planter will sit on a patio or porch.

Keep the decorated pot out of constant heavy rain unless you have used outdoor-rated products.

Use a plastic liner pot inside the planter if you are worried about moisture.

Choose a simple colour palette if you want a more elegant coastal look. Aqua, white, and pale green always look fresh together.

Variations To Try

Make a blue and white sea glass planter for a classic beach cottage look.

Use only green glass for a soft garden-inspired pot.

Mix sea glass with tiny shells for extra texture.

Use broken china pieces for a cottagecore mosaic planter.

Create a mini version using small terracotta pots for party favours or table settings.

Make a set of three pots in different sizes for a windowsill herb garden.

Add a band of sea glass around the rim only if you want a quicker version.

Use a thrifted ceramic pot instead of terracotta for a recycled craft project.

For another small clay project with a natural handmade feel, have a look at this crystal pinch pot tutorial. It would pair beautifully with a coastal craft table or summer workshop theme.

Troubleshooting

If the glass keeps sliding, the pot may be too upright or the glue may need more time to grab. Lay the pot on its side and work in smaller sections.

If the filler looks messy, use a damp cloth to clean the glass before the filler fully dries.

If the pot feels too rough, lightly smooth the filler once dry and seal it afterward.

If the glass colours look dull, clean the surface thoroughly and use a clear sealer to bring back a little shine.

If you do not have enough sea glass, decorate just the top half of the pot or create a scattered design instead of covering the entire surface.

Handmade Gift Idea

A DIY sea glass planter makes a lovely handmade gift, especially for someone who loves beach decor, gardening, succulents, or coastal colours. Add a small plant, wrap the pot with raffia or cotton ribbon, and tuck in a handwritten tag.

You could also make this as a memory gift using sea glass collected from a family beach holiday. That gives it a little story, and handmade gifts with a story are always the ones people keep.

This is the sort of craft that feels relaxed, pretty, and useful all at once. It does not need to be perfect, either. In fact, the slightly uneven pieces are what make it look handmade rather than mass-produced. A few wonky bits just prove a real person made it, probably while drinking tea and wondering why craft glue is always either missing or glued shut.</span

Explore

books Christmas CraftGossip Giveaways Craft Inspirations Easter glass halloween Home Decor kid crafts More Crafts Patterns & Tutorials Recycled and Thrifted Ideas recycled art Recycled Clothing Recycled Jewelry Recycled kids crafts Recycled Sewing Recycling Ideas Recycling Organizing tin can

Featured Posts

Two great ways to dress up your eggs for Easter with recycled clothes

Dress up your corn hole game for Halloween

Back-to-School Notebooks: Part 1

How to make an easy Valentine’s Day sweet treat

Blind and texture embossing techniques

RSS More Articles

  • Designer Spotlight: Charts and Stuff
  • Book Review: Pom Pom Pom Christmas – 40 Festive Pom Poms to Make
  • Free Baby Booties Sewing Pattern: Easy Fabric Booties in 4 Sizes
  • Free Sewing Pattern: Sausage Dog (Dachshund) Softie
  • Knit a Stunning Scarf Studded with Muppets
  • The Complete Guide to Crochet Dolls and Animals Review – The Best Book for Amigurumi Lovers Ready to Design Their Own Patterns
  • Digital Stamps vs Rubber Stamps: Which Is Better for Cardmaking?
  • How to Make a Potion Shaker Card for Halloween
  • Easy Halloween Fabric Candy Basket Beginner Sewing Pattern for Trick-or-Treating
  • Book Review: Once in a Blue Moon

Copyright © 2026 · CraftGossip | Start Here | Contact Us | Link to Us | Your Editors | Privacy and affiliate policy