• Home
  • Suggest A Craft
  • DIY Newsletter

Recycled Crafts

Creative DIY Projects That Turn Trash Into Treasure

  • About CraftGossip
  • Our Network
    • Bath & Body Crafts
    • Candle Making Ideas
    • Crochet Ideas
    • Cross Stitch
    • Edible Crafts
    • Felting Patterns
    • Glass Art
    • Home & Garden Ideas
    • Indie Crafts
    • Jewelry Making
    • Kids Crafts
    • Knitting Patterns
    • Lesson Plans
    • Needlework
    • Party Ideas
    • Polymer Clay
    • Quilting Ideas
    • Recycled Crafts
    • Scrapbooking
    • Sewing Patterns
    • Card Making
    • DIY Weddings
    • Not Craft Ideas
  • Giveaways
  • Roundups
  • Store
  • Search

Free Flower template perfect for recycling leftovers

October 18, 2009 by Stefanie Girard

flowerpin 
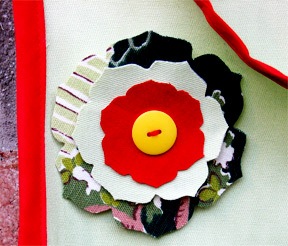
I don’t know about you but I keep my fabric scraps. They seem to coming in handy for project just like this cute little three tiered flower pin from the blog Argot. She uses it to dress up a cute apron that has a pocket made from one of the same fabrics.

[tags] recycled fabric free flower template[/tags]

Related Posts:

  • DIY Upcycled Pants to Apron: A Fun and Easy Project
  • How to make recycled clothes pin puppets
«
»

Comments

  1. Ariela Haro von Mogel says

    October 19, 2009 at 9:19 am

    Thank you for posting this!
    I also keep scrap fabrics and don’t know what to do with it. I have often given away large chunks of fabric I don’t want anymore to craft vendors at places like the Farmer’s Market for free. At least they can reuse it, make it into something cool and make some profit.
    But, as for the little bits of fabric, Oy, what a chore. It’s hard to think of something nice and/or useful to do with it other than chuck it in the garbage.

  2. Elizabeth says

    November 27, 2009 at 11:33 am

    You can use scraps of thin fabric to make greetings cards. I folded A4 pieces of stiff paper into 3 panels and cut out stars and Christmas tree shapes in the middle panel. Then I stuck the fabric scraps on the back of the card to cover the empty shapes. Then I folded back the first panel to cover the rough side, and glued it down. Hey presto, one Christmas card!

Have you read?

DIY Paper Bag Mushrooms – A Creative Upcycled Craft for Kids and Nature Lovers

There’s something magical about mushrooms — maybe it’s the fairy-tale vibes or their cozy woodland charm. Either way, turning ordinary brown paper bags into mushrooms is a fun, hands-on craft project that kids (and adults) will enjoy. The best part? You’re reusing materials that might otherwise go to waste. Win-win!

This easy tutorial walks you through making your very own forest of recycled mushrooms using simple supplies you likely already have around the house.

What You’ll Need:

  • Brown paper lunch bags (you can even use grocery bags cut to size)

  • Scrap paper or newspaper for stuffing

  • String, yarn, or twine

  • Scissors

  • Paints (acrylic or tempera work best)

  • Paintbrushes or sponges

  • Optional extras: markers, stickers, googly eyes, craft glue

Step-by-Step: How to Make Your Mushrooms

Step 1: Create the Mushroom Top
Start by opening your paper bag and gently crumpling up some newspaper or scrap paper. Stuff it into the bottom of the bag — not too tight, just enough to give it a rounded shape that will form the mushroom cap.

Step 2: Form the Stem
Once the top is nice and puffy, hold the bag just underneath the stuffed section and twist it lightly to shape the stem. Tie a piece of twine or string around this part to hold the form. You’ll now have a mushroom top with a long paper bag hanging down — that’s your stem.

Step 3: Trim to Size
If the stem looks too long or uneven, grab your scissors and snip it down to your preferred height. You can even experiment with making some taller and some short and chubby for a little mushroom variety.

Step 4: Paint and Decorate
Time for the fun part — painting! Flip the mushroom cap upright and paint it any way you like. Classic red with white spots? Go for it. Bright blue with glitter? Why not! Use brushes or dabbers to add spots, swirls, or patterns. Let kids express their creativity — there’s no wrong way to decorate a magic mushroom!

Step 5: Let It Dry
Place your mushrooms somewhere safe to dry. You can use a sheet of newspaper or cardboard to avoid mess. Once dry, they’ll stiffen a little and hold their shape nicely.

Step 6: Display Your Mushroom Garden
Line them up on a windowsill, add them to a play area, or build a fairy village in the corner of a room. You can even glue them to a cardboard base and add moss, pebbles, and tiny paper critters for a full scene.

Extra Ideas:

  • Add flags or tiny doors to make mushroom homes.

  • Draw faces or names on the stems to turn them into characters.

  • Use cotton balls or pom-poms for fluffy mushroom spots.

Why This Project Rocks:

This is one of those crafts that doesn’t need a trip to the store or fancy tools — just a little time, a few basic supplies, and a bit of imagination. Plus, it encourages kids to see the creative potential in everyday materials — a great step toward more mindful, eco-conscious crafting.

So go ahead, raid the recycling bin and bring a mini mushroom forest to life.

How to make giant toadstools out of recycled tires

How to make champagne cork toadstools

How to make recycled Easter egg mushrooms

How to make recycled toilet paper tube mushrooms

How to make a rainbow forest of adorable recycled mushrooms

Explore

books Christmas CraftGossip Giveaways Craft Inspirations Easter glass halloween Home Decor kid crafts More Crafts Patterns & Tutorials recycled art Recycled Clothing Recycled Jewelry Recycled kids crafts Recycled Sewing Recycled Tutorials Recycling Ideas Recycling Organizing tin can

RSS More Articles

  • Combine Knit and Crochet with this Cute Checkers Set
  • Rosh Hashanah Coloring Sheets and Other Activities for Kids
  • Cassette Tape Shaped Mini Album
  • Free Crochet Pattern – Chunky Rib Tunisian Hat and Cowl
  • What is Silver Art Clay or Precious Metal Clay (PMC) and How Do You Work With It (and Fire It!)
  • Learn How to Sew Potholders with Creativebug’s Online Class!
  • Pumpkin Pie Melt and Pour Soap: A Cozy Fall Soap Recipe That Smells Good Enough to Eat
  • DIY Tablet Pouch Tutorial: A Stylish and Practical Craft
  • Designer Spotlight: Embrovia
  • You’ll Go Batty Over These 40 Bat-Themed Sewing Patterns for Halloween!

Copyright © 2025 · CraftGossip | Start Here | Contact Us | Link to Us | Your Editors | Privacy and affiliate policy