 Even if you don’t know how to knit or crochet you can can still get in on the love of yarn bombing. Simply wrap yarn in two directions over two sides of the chain link fence. This idea for yarn wrapped heart is from the blog Casa De Firulas.
Have you read?
How To Make A Christmas Lace Bowl From An Old Doily
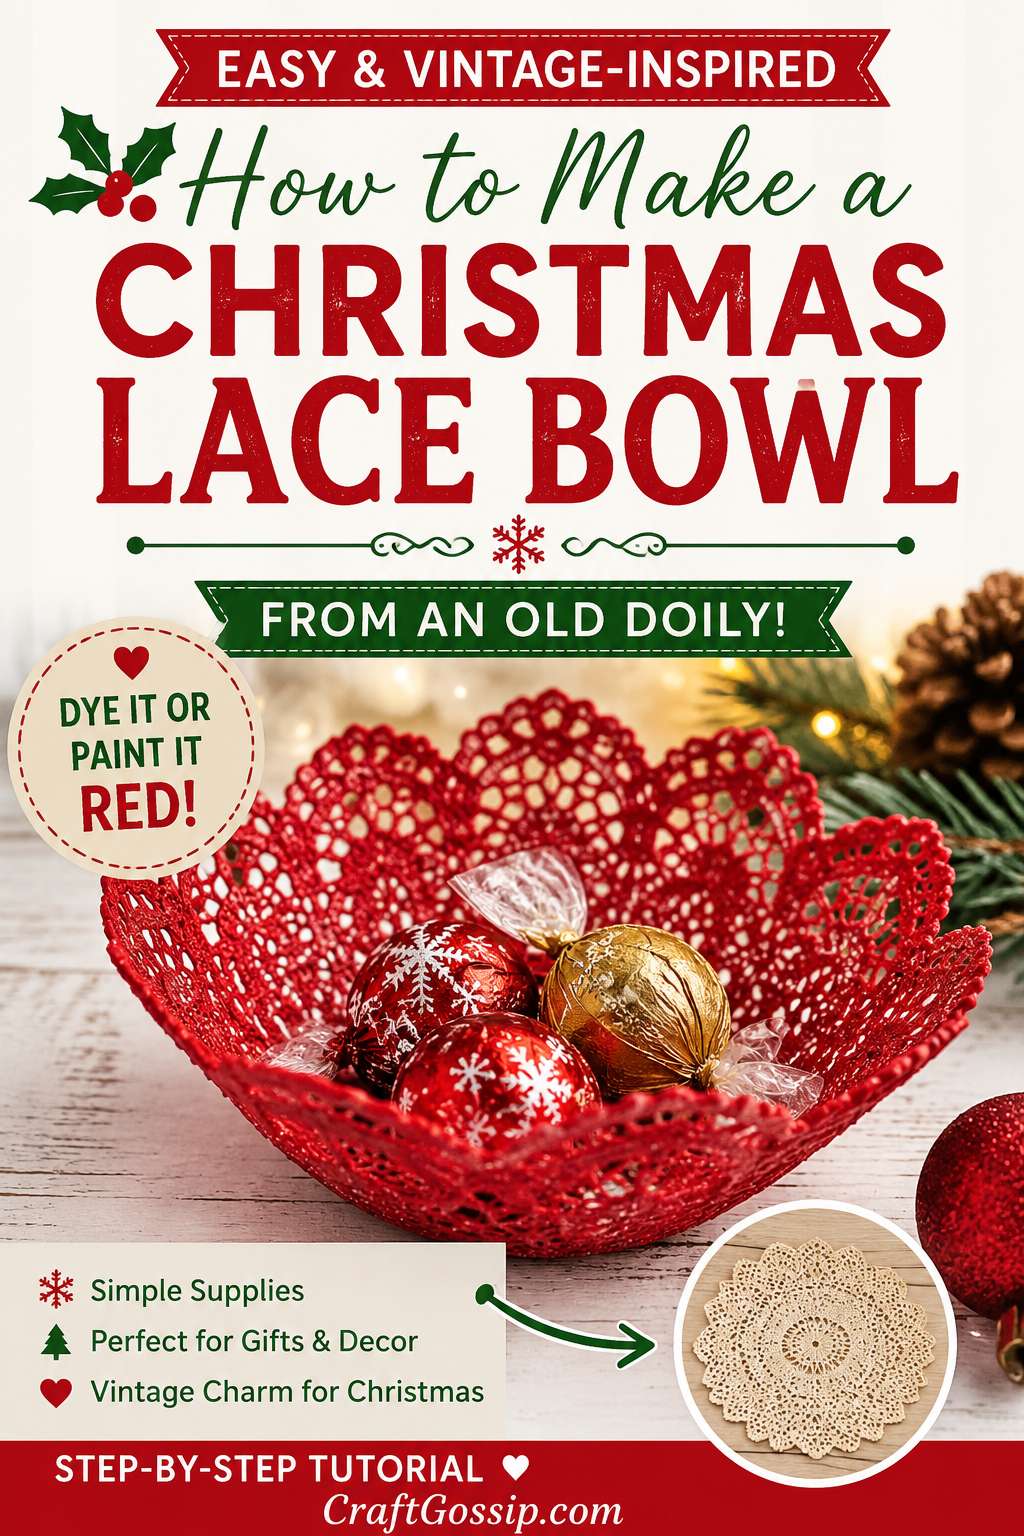
There is something so charming about a lace doily at Christmas, especially when it has that vintage handmade feeling that makes you think of biscuit tins, old linen cupboards, and someone’s grandmother who absolutely knew how to starch things properly.
This Christmas lace bowl is a pretty little upcycled craft made from an old lace doily, fabric stiffener or glue, and a bowl used as a mould. Once it dries, you end up with a delicate decorative bowl that can be used for wrapped sweets, baubles, jewellery, table favours, or festive little gift displays.
For this Christmas version, we are giving the lace a lovely red finish. You can either dye the lace using fabric dye for a deeper, more even colour, or paint it with watered-down red acrylic paint for a softer handmade look. Both methods work, and both have their own charm. The dye gives a more traditional fabric finish, while watered-down paint gives you a little more control if you want that slightly rustic, vintage Christmas feel.
This is a great project for using old doilies, thrifted lace, or crochet pieces that are too pretty to throw away but maybe not quite table-ready anymore. You know the ones — a tiny stain here, a pulled thread there, and suddenly they live in the “I’ll do something with this one day” pile. Well, today is that day.
If you enjoy vintage-style handmade decorations, you might also like this lace-inspired idea for DIY stamped air dry clay bowls, or have a browse through the CraftBits home crafts section for more easy handmade décor ideas.
What You Can Use A Christmas Lace Bowl For
These lace bowls are decorative rather than heavy-duty, but they are surprisingly useful during the festive season.
Use them for:
- wrapped Christmas chocolates
- small baubles
- jewellery gifts
- handmade soaps
- table place setting gifts
- battery tea lights
- sewing clips or buttons
- Christmas craft stall displays
- festive trinkets
- small wrapped treats
They also look beautiful on a mantel, sideboard, Christmas lunch table, bedside table, or craft room shelf. Just remember that these bowls are not washable and should not be used for wet food or anything heavy.
Supplies You Will Need
You will need:
- 1 lace doily or piece of lace fabric
- Red fabric dye or red acrylic paint
- White PVA craft glue or fabric stiffener
- Warm water
- Bowl, jar, or rounded container to use as a mould
- Plastic wrap or cling film
- Mixing bowl or disposable container
- Foam brush
- Gloves
- Baking paper or newspaper
- Scissors
- Optional: gold paint, glitter, ribbon, beads, small bells, or metallic wax
- Optional: spray sealer
If you are planning to make several of these for Christmas gifts or craft stalls, it is worth having a large bottle of craft glue or fabric stiffener on hand. A good foam brush, disposable gloves, and a self-healing craft mat or covered table will make the whole thing much less messy. You can usually find basic supplies like PVA glue, acrylic paint, fabric dye, foam brushes, and plastic wrap on Amazon. For vintage doilies and lace bundles, Etsy is always a lovely place to look, especially if you want mismatched old-fashioned pieces.
Before You Start: Dye Or Paint?
There are two easy ways to make your lace bowl red.
Option 1: Fabric Dye
Fabric dye is best if you want a richer, more even red and your lace is made from cotton or another natural fibre. Vintage crochet doilies often dye beautifully, especially if they are cotton.
Fabric dye may not work as well on synthetic lace, so check the fibre if you can. If you are using a thrifted lace piece and have no idea what it is made from, do a small test first.
Option 2: Watered-Down Acrylic Paint
Watered-down acrylic paint works well if you want a softer red finish or if your lace is synthetic and may not take dye properly. It is also handy if you only need to make one bowl and do not want to set up a full dye bath.
This method gives the lace a more painted, handmade finish. It can be a little rustic, which I personally think suits Christmas crafts beautifully.
Step 1: Choose Your Lace
Choose a clean lace doily with a pretty pattern. Round doilies are the easiest to shape into bowls, but oval or square pieces can work too.
Look for lace with strong details such as flowers, scalloped edges, stars, leaves, or repeating patterns. Once the lace is stiffened, those details become the feature.
Avoid lace that is too fragile, torn, or full of loose threads. A little wear is charming. Falling apart in your hands is less charming.
If your lace has stains, do not worry too much if you are dyeing or painting it red. The colour will hide many small marks.
Step 2: Wash And Dry The Lace
If your lace is thrifted or has been stored for a long time, give it a gentle wash first.
Use warm water and mild soap, then rinse well and let it dry completely. This helps remove dust, oils, or old starch that could stop the dye or paint from soaking in properly.
Do not use fabric softener, as it can interfere with the stiffening process later.
Step 3: Colour The Lace Red
Now it is time to turn the lace into something festive.
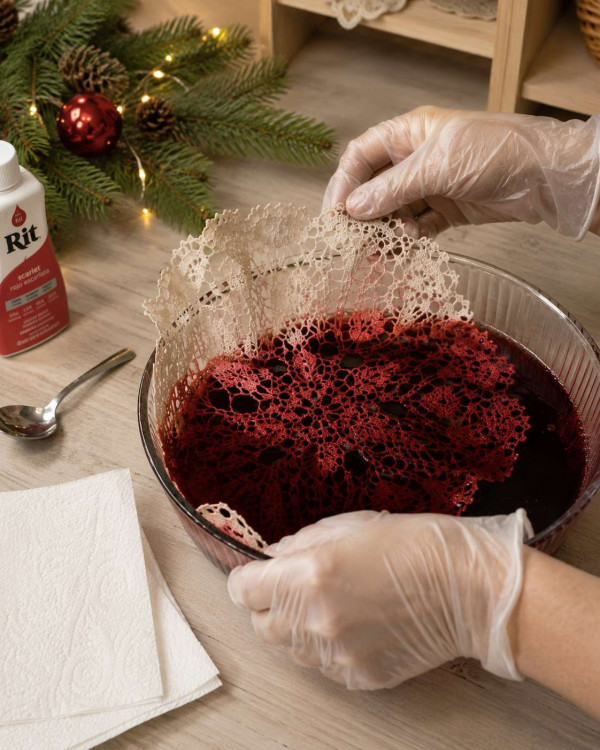
Method 1: Dyeing The Lace Red
Follow the instructions on your fabric dye packet, as different brands vary slightly.
As a general guide:
- Wear gloves and protect your work surface.
- Mix the red fabric dye according to the packet directions.
- Place the lace into the dye bath.
- Gently move it around so the colour reaches all the little openings and details.
- Leave it in the dye until it reaches the shade you like.
- Rinse according to the dye instructions.
- Let the lace dry completely before stiffening.
For a deep Christmas red, you may need to leave the lace in the dye bath a little longer. Keep in mind that lace often looks darker when wet and slightly lighter once dry.
Method 2: Painting The Lace With Watered-Down Red Paint
If you are using acrylic paint, mix:
1 part red acrylic paint to 1 part warm water
Stir until smooth. The mixture should be thin enough to soak into the lace but not so watery that the colour disappears.
Place the lace on baking paper or plastic wrap. Use a foam brush to dab the paint mixture into the lace, making sure both sides are covered. You can also dip the lace directly into the mixture and gently squeeze out the excess.
If you want a darker red, let the first coat dry and then add a second coat.
For a rustic vintage look, do not worry if the colour is slightly uneven. It gives the bowl a lovely handmade finish.
Let the lace dry before moving on to the stiffening step.
Step 4: Prepare Your Bowl Form
Choose a bowl, jar, or rounded container that matches the shape you want.
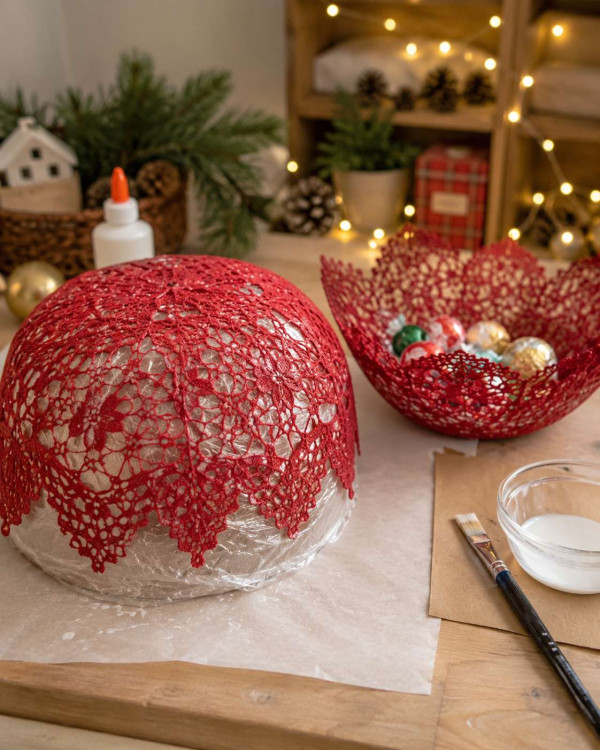
Turn the bowl upside down and cover it tightly with plastic wrap. Smooth out as many wrinkles as possible, because big folds in the plastic can leave marks in the lace.
Place the covered bowl on baking paper or newspaper. This is a gluey project, and it is much nicer to throw away a messy sheet of paper than scrape dried glue off the table later.
Step 5: Mix The Stiffener
You can use ready-made fabric stiffener or make your own with white craft glue.
For homemade stiffener, mix:
2 parts white PVA glue to 1 part warm water
For example:
- 2 tablespoons white glue
- 1 tablespoon warm water
Stir until smooth.
If the mixture feels too thick to soak through the lace, add a tiny splash of warm water. If it feels very runny, add a little more glue. You want the lace fully coated, but not dripping in puddles.
Step 6: Soak The Red Lace
Place the red lace into the stiffener mixture and gently press it down until it is fully saturated.
Use your fingers or a foam brush to work the stiffener through the pattern. Make sure the edges and centre are coated well, because those areas help the bowl hold its shape.
Lift the lace and let the excess drip back into the container. Do not wring it out, as that can stretch or distort the lace.
Step 7: Shape The Lace Over The Bowl
Carefully drape the wet lace over your plastic-wrapped bowl form.
Centre the lace so the pattern sits nicely. Smooth it gently with your fingers and arrange the edges so they fall evenly around the bowl.
You can create:
- a neat scalloped edge
- soft natural folds
- a shallow dish shape
- a deeper candy bowl shape
- a fluted edge
Once you are happy with the shape, dab a little extra stiffener onto any areas that look dry.
Step 8: Let It Dry Completely
Leave the lace bowl to dry for at least 24 hours.
If your lace is thick, heavily painted, or the weather is humid, it may need 48 hours or longer. Do not rush this step. A lace bowl that is removed too early can sag, flop, or lose its shape.
Place it somewhere safe where it will not be bumped. If you have pets, put it somewhere they cannot “help.” Every crafter knows that cats and drying projects have a special and dangerous relationship.
Step 9: Remove The Lace Bowl From The Form
Once the lace is completely dry and firm, gently lift it off the bowl form.
Peel away the plastic wrap carefully. If any areas still feel soft, place the lace bowl upright and let it dry longer.
If the base is a little uneven, lightly mist just the bottom with water and press it gently onto a flat surface. Let it dry again before using.
Step 10: Add Christmas Details
Your red lace bowl can be left as it is, or you can dress it up a little.
Try adding:
- a dry-brushed gold edge
- tiny gold bells
- red velvet ribbon
- pearl beads
- a little glitter
- metallic wax on the raised lace areas
- a small bow on one side
- a dusting of faux snow
- a clear spray sealer for extra protection
A touch of gold paint on the rim looks especially pretty for Christmas. Use a small brush and go lightly so you still see the lace detail.
Christmas Styling Ideas
These red lace bowls look beautiful in all sorts of festive settings.
Try placing one:
- on each Christmas lunch place setting
- beside a guest bed with wrapped chocolates
- on a mantel with greenery and fairy lights
- on a bathroom vanity with handmade soaps
- in a craft stall display filled with ornaments
- under a small battery tea light
- beside your sewing machine for festive stitch markers and clips
- filled with mini baubles as a centrepiece
For a vintage Christmas table, mix red lace bowls with greenery, old brass candlesticks, white plates, and linen napkins. It looks fancy without needing to actually be fancy, which is my favourite sort of decorating.
Can You Use Spray Paint Instead?
You can use spray paint, but it gives a different finish. Spray paint tends to sit more on top of the lace rather than soaking into it. It can also clog up the delicate openings if sprayed too heavily.
If you use spray paint, apply very light coats and let each coat dry before adding another. For this project, I prefer fabric dye or watered-down acrylic paint because the lace still looks soft and detailed.
Can You Make This With Crochet Doilies?
Yes, crochet doilies work beautifully for this craft. In fact, they often hold their shape very well because the cotton thread is thicker than fine lace fabric.
A crochet doily may need extra stiffener and a longer drying time, especially if it has raised stitches or a dense centre.
Troubleshooting Tips
The bowl is too soft
Brush on another coat of fabric stiffener or glue mixture and let it dry again. Make sure the lace is fully dry before judging the final stiffness.
The red colour looks patchy
If you used paint, add a second thin coat. If you used dye, the lace may contain synthetic fibres that did not absorb the dye evenly. A watered-down paint wash can help even it out.
The lace stuck to the plastic wrap
Peel slowly and gently. Next time, make sure the lace is not sitting in a thick puddle of glue at the base.
The bowl has cloudy glue marks
This usually means there was too much glue sitting on the surface. You can often disguise it with a little red paint, gold dry brushing, or glitter.
The shape is uneven
Handmade lace bowls often have a soft organic shape. If you want to adjust it, lightly mist the area with water, reshape gently, and let it dry again.
Gift Ideas For Christmas Lace Bowls
These make sweet handmade gifts, especially if you fill them with something small.
Try filling them with:
- wrapped chocolates
- handmade soap
- a small candle
- sewing notions
- hair clips
- earrings
- lip balm
- mini ornaments
- tea bags
- Christmas biscuits in a clear bag
Wrap the filled bowl in cellophane and tie it with ribbon for a simple handmade gift. It is the sort of present that looks thoughtful without requiring three days of emotional recovery afterward.
A Pretty Way To Use Old Doilies At Christmas
This Christmas lace bowl is a lovely way to give old doilies and lace scraps a festive second life. Whether you dye the lace a rich Christmas red or paint it with watered-down acrylic for a softer rustic finish, the result is delicate, handmade, and full of vintage charm.
It is simple enough for beginners, affordable enough to make in batches, and pretty enough to use for gifts, table décor, or craft stall stock. And best of all, it lets you turn something forgotten into something festive — which is exactly the sort of Christmas crafting I love.