There is something wonderfully strange about a freestanding plaster hand. Paint it white and drape it with rings, and it becomes an elegant jewellery holder. Paint it grey, black or slightly green, and suddenly it looks as though it has crawled straight out of a haunted graveyard.
That is what I love about this easy plaster hand craft: the same basic project can be styled for Halloween, gothic home décor, theatre props, jewellery storage or even a quirky handmade gift.
The clever part is that you do not need an expensive hand-shaped mould. This project uses an ordinary rubber glove to form the fingers and palm, along with a wide-mouth jar to support the glove while the plaster sets. It is one of those delightfully simple ideas that makes you wonder why you have not tried it before.
You can see the original step-by-step method in this DIY plaster hand jewellery display tutorial from Factory Direct Craft.
What You Need to Make a Plaster Hand
The basic supplies are refreshingly simple:
- Plaster of Paris
- A rubber or latex-style cleaning glove
- A wide-mouth Mason jar or sturdy container
- The jar’s screw ring or a strong rubber band
- A disposable container for mixing plaster
- A stirring stick or old spoon
- Water
- Fine-grit sandpaper
- Acrylic paint, optional
- Clear sealer, optional
You can find Plaster of Paris and basic casting supplies on Amazon, but do check the package size before ordering. A tiny tub disappears surprisingly quickly once you begin filling an entire glove.
How the Rubber Glove Plaster Hand Method Works
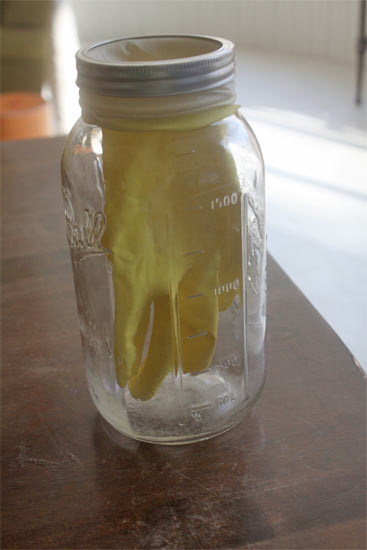
The cuff of the rubber glove is secured around the mouth of a wide jar so that the glove hangs down inside without touching the bottom or sides.
Plaster of Paris is then mixed according to the manufacturer’s directions and carefully poured into the glove. The plaster fills each finger and the palm, creating a solid hand-shaped casting as it hardens.
Once fully set and cool, the rubber glove is peeled or carefully cut away. Small bumps and rough edges can then be smoothed with fine sandpaper.
The original project leaves the plaster hand standing upright on the flat wrist section, making it perfect for holding rings, bracelets and necklaces.
Important Plaster of Paris Safety Warning
Never place your real hand, fingers or any other body part directly into wet Plaster of Paris.
Plaster becomes warm while it sets, and safety data sheets specifically warn against using it to make an enclosed cast around any part of the body because the heat can cause serious burns.
For this project, the empty rubber glove is used only as a disposable mould. No part of your body should ever be enclosed inside the plaster.
Work in a ventilated area, avoid breathing the dry plaster dust, wear eye protection when mixing or sanding, and follow the instructions printed on your particular product.
Tips for Getting Better-Looking Fingers
The fingers are the fiddliest part of this project, because of course they are. Crafts rarely save their awkward stage for somewhere discreet.
Before filling the glove completely, gently squeeze and massage a small amount of plaster down into each fingertip. This helps reduce empty pockets and missing fingertips.
Tap the side of the jar gently after pouring to encourage trapped air bubbles to rise.
Do not make the plaster mixture overly thick or it may struggle to flow into the fingers. At the same time, avoid adding extra water beyond the manufacturer’s recommended ratio, as this can weaken the finished casting.
Choose a glove that is not heavily textured unless you want that pattern transferred onto the plaster. A smooth glove will generally create a cleaner surface.
Make sure the glove hangs freely and that the finished hand will be able to lift out through the mouth of the jar. A wide-mouth jar is much easier to work with than a narrow one.
How to Turn It Into a Creepy Halloween Hand
For an easy DIY Halloween prop, paint the plaster hand with layers of grey, brown, black and muted green acrylic paint.
Start with a medium grey base coat. Once dry, brush darker paint into the creases around the knuckles, fingernails and joints. Wipe away some of the colour before it dries completely so it remains in the recessed areas.
Dry-brush a lighter grey or bone colour across the raised areas to emphasise the texture.
You could also add:
- Blackened fingernails
- Faux moss around the wrist
- Artificial cobwebs between the fingers
- Plastic spiders
- Drips of dark red paint
- A distressed cuff made from old lace or torn fabric
- Rings from the thrift store
- Battery-operated candles arranged around the base
For more decorations with the same gloriously spooky feeling, take a look through our recycled Halloween craft ideas. It is amazing what can be made from old jars, bottles, fabric scraps and the sort of odds and ends most sensible people would have thrown away years ago.
Make a Gothic Jewellery Holder
Leave the plaster white for a clean sculptural finish, or paint it matte black, soft pink, metallic gold or antique bronze.
A plaster hand jewellery holder is particularly useful for displaying:
- Rings
- Bracelets
- Bangles
- Lightweight necklaces
- Watches
- Small chains
For an antique look, paint the entire hand black or dark brown, then lightly dry-brush metallic gold over the raised areas.
A coat of matte or satin clear sealer will help protect the painted surface and reduce chalky plaster dust.
Readers who enjoy making their own jewellery displays may also like this DIY silicone craft mould tutorial, which shows how small found objects can be turned into reusable moulds for craft projects.
Other Creative Ways to Use Plaster Hands
Once you have made one, you may start seeing plaster hands everywhere. This is how craft supplies multiply. It is not our fault.
Try using them as:
Table Place Card Holders
Slip a name card between the fingers for a Halloween dinner, gothic wedding or murder-mystery party.
Creepy Garden Props
Paint the hands to resemble aged stone and position them so they appear to be reaching out from a pot of soil.
Keep in mind that untreated plaster is porous and not weatherproof, so outdoor pieces should be sealed thoroughly and placed somewhere protected from heavy rain.
Costume and Theatre Props
Use several hands as stage decorations, haunted-house props or photography accessories. They would look particularly effective emerging from an old drawer, suitcase or faux grave.
Handmade Ring Displays
Create several hands in different colours for displaying jewellery at craft fairs, market stalls or in product photographs.
Surreal Wall Décor
Attach a lightweight plaster hand securely to a wooden plaque and use it as unusual wall art or a holder for dried flowers.
How to Repair Small Flaws
A few bubbles and rough patches are normal with homemade plaster casting.
Small holes can be filled with a little fresh plaster or lightweight wall filler. Allow the repair to dry completely, then sand it smooth.
For tiny surface imperfections, fine-grit sandpaper may be all you need.
Avoid aggressive sanding around the fingers, as they are the narrowest and most vulnerable parts of the casting. Support each finger with your other hand while sanding so you do not accidentally snap one off five minutes before the project is finished. Yes, that is exactly the sort of thing plaster likes to do.
Painting and Sealing the Finished Hand
Make sure the plaster hand is completely dry before painting. Although the surface may feel hard relatively quickly, moisture can remain inside a thick casting.
Once dry:
- Brush away loose plaster dust.
- Apply a plaster-compatible primer or diluted acrylic base coat if desired.
- Add one or more coats of acrylic craft paint.
- Allow each coat to dry.
- Finish with a clear matte, satin or gloss sealer.
Matte finishes work beautifully for stone, skeleton and zombie hands. Satin or gloss finishes are better suited to colourful jewellery displays and pop-art décor.
An Easy Casting Project With Plenty of Personality
This easy plaster hand project sits somewhere between practical storage and delightfully odd home décor, which is probably why it is so much fun.
Keep it white for a modern jewellery holder, age it with metallic paint for a vintage display, or turn it into a wonderfully creepy Halloween hand complete with spiders, rings and ragged lace.
Just remember to use the glove as the mould and never cast Plaster of Paris directly around a real hand. Once you have that safety rule firmly in place, the creative possibilities are very much in your hands. Sorry, I had to.
Pop on over to the blog Factory Direct Craft for the easy tutorial on how to make plaster hands.
This project requires Plaster of Paris.