• Home
  • Suggest A DIY
  • DIY Newsletter

Recycled Crafts

Creative DIY Projects That Turn Trash Into Treasure

  • About CraftGossip
  • Our Network
    • Bath & Body Crafts
    • Candle Making Ideas
    • Crochet Ideas
    • Cross Stitch
    • Edible Crafts
    • Felting Patterns
    • Glass Art
    • Home & Garden Ideas
    • Indie Crafts
    • Jewelry Making
    • Kids Crafts
    • Knitting Patterns
    • Lesson Plans
    • Needlework
    • Party Ideas
    • Polymer Clay
    • Quilting Ideas
    • Recycled Crafts
    • Scrapbooking
    • Sewing Patterns
    • Card Making
    • DIY Weddings
    • Not Craft Ideas
  • Giveaways
  • Roundups
  • Store
  • Search

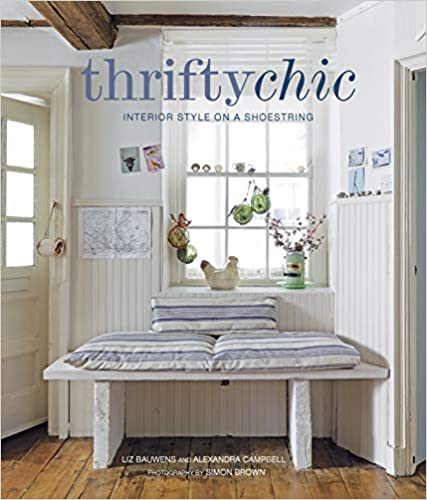
Book Review – Thrifty Chic: Interior Style on a Shoestring

September 13, 2021 by Shellie Wilson

Learn how to reuse, recycle, restyle, restore, and revamp your old furnishings to create a stylish and unique home, without spending a fortune! Whether you are on a tight budget, or simply want to give your existing home a new look, Thrifty Chic provides a treasure trove of ideas at your fingertips.

Divided into 7 chapters, Thrifty Chic will take you through everything you need to know to jazz-up your home. Starting with “Elements of Design”, you will learn how to utilize fabric, paint, windows, frames, lighting, and more, to make the most of your environment. Then, room by room, each chapter will show you how best to pull together mismatched items into cohesive schemes, how to upcycle furniture, and how to introduce some clever ideas for storage. You will learn how to create certain styles in your home, from French-inspired antique chic, to the cosmopolitan eclectic and the steel-finished urban cutting-edge. You will even gain insider tips on what to look for at antique markets and in thrift stores, and how to care for and restore your bargain purchases.

Packed full of irresistible designs, and with a final chapter detailing how to do the projects yourself, there will be no stopping you from creating your perfect habitat.
«
»

Have you read?

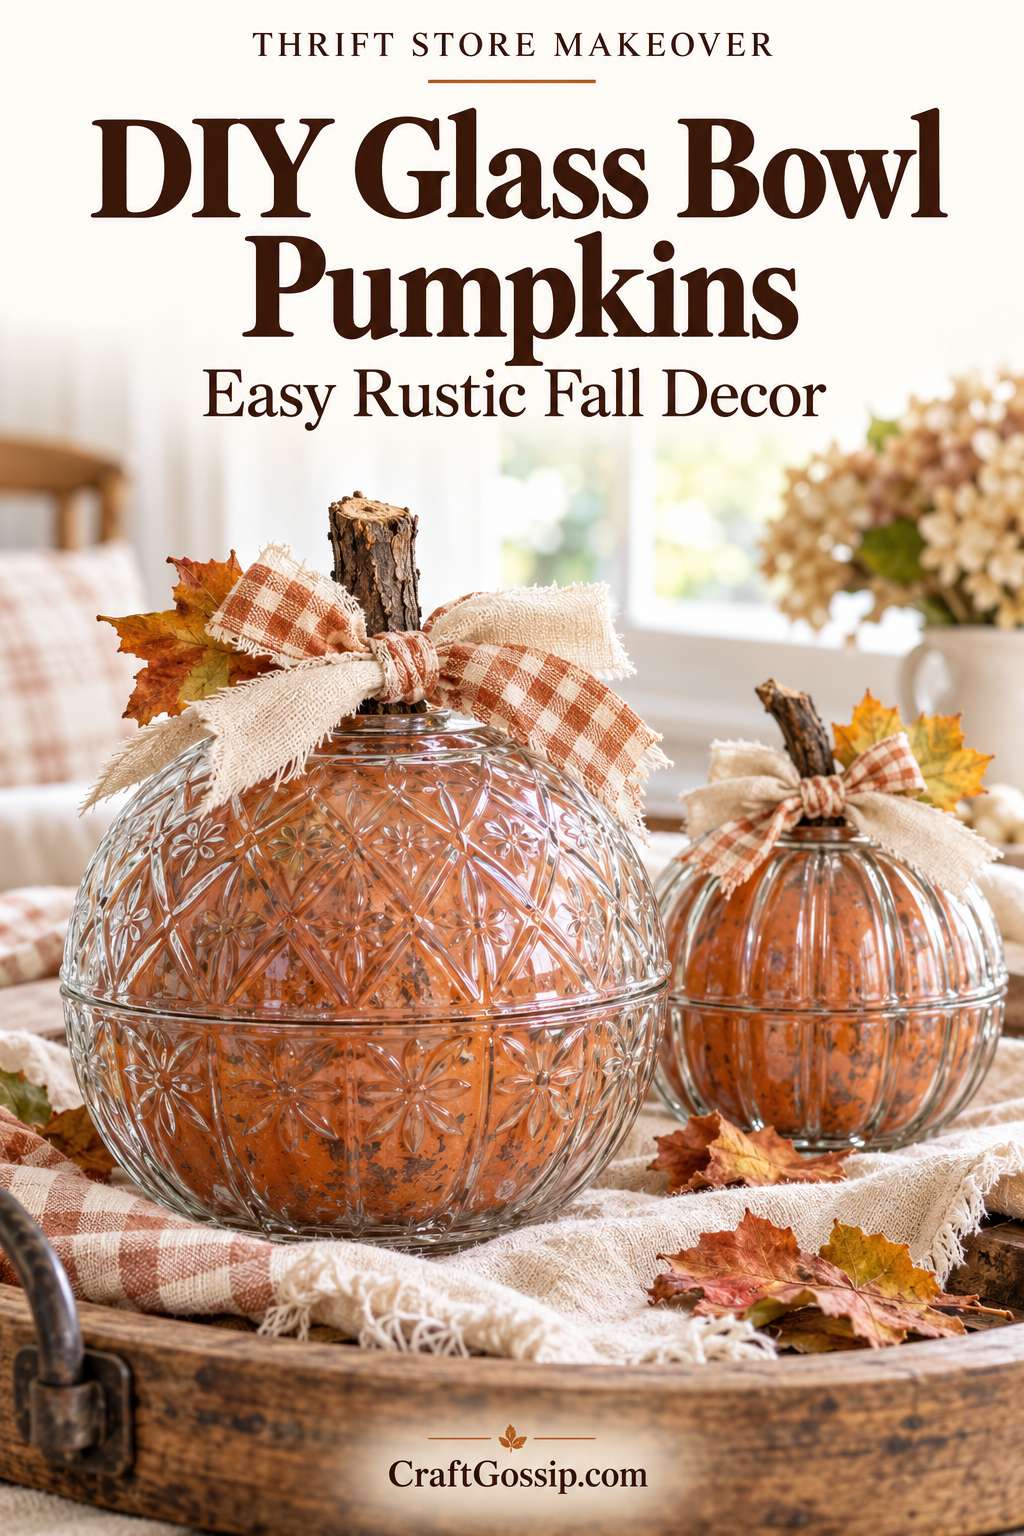
Thrift Store Upcycling: Rustic Pumpkin Decorations From Glass Bowls

You know those patterned glass bowls that seem to appear on every thrift-store shelf? The little dessert bowls, the heavy pressed-glass dishes, and the ones that probably spent years tucked away in somebody’s china cabinet? This project gives them a lovely second life as rustic pumpkin decorations.

Two matching bowls form the pumpkin, with orange paint on the inside so their glass patterns remain visible from the outside. Add a twig stem and a bow made from an old shirt or sheet, and you have an autumn decoration built around secondhand finds.

I love that the glass does so much of the decorating here. Ribbed bowls suggest pumpkin grooves, while diamond and floral patterns give the finished piece a vintage feel. A slightly uneven orange finish suits the project beautifully, especially paired with faded fabric and natural wood.

You don’t need valuable crystal for this. Ordinary pressed-glass bowls work just as well, so start with pieces you already own or inexpensive thrift-store finds.

What You’ll Need

  • Two matching secondhand glass bowls
  • Orange air-drying paint labelled as suitable for glass
  • Optional brown or ochre glass paint compatible with your orange paint
  • A small paintbrush and sponge
  • Dishwashing liquid and a cleaning cloth
  • Painter’s tape
  • A short twig or recycled cork
  • Adhesive suitable for bonding wood or cork to glass
  • A strip of fabric from an old shirt, sheet or other textile
  • Optional leftover jute twine or leaves from an old artificial arrangement
  • Scissors

Allow approximately an hour of crafting time, plus the drying and curing times listed on your paint and adhesive.

Choosing Your Thrift Store Bowls

Before buying your bowls, check how they fit together. Place one upright and the other upside down on top, with their rims meeting. You’re looking for a rounded shape, matching rim sizes and a stable base.

The upper bowl should ideally have a small flat base where you can attach the stem. Avoid cracked glass, chipped rims or combinations that wobble.

There’s no need to buy a complete set. Two suitable bowls are enough, and mismatched patterns can look lovely if the rims fit properly.

How to Make Rustic Glass Bowl Pumpkins

1. Clean and Prepare the Bowls

Wash both bowls thoroughly with dishwashing liquid, rinse and leave them to dry.

Follow the preparation directions on your glass paint. If the manufacturer recommends cleaning with rubbing alcohol, do that before painting.

Use painter’s tape to mask a narrow strip around each rim. Keeping these meeting edges free of paint gives the assembled pumpkin a cleaner finish.

2. Add a Little Rustic Colour

Painting inside glass works in reverse: the first colour you apply is the colour you’ll see through the glass.

If you’d like an aged finish, start by lightly sponging a few small patches of brown or ochre paint onto the interiors. Keep this sparse. You want gentle variation rather than large dark patches.

Let that layer dry according to the label before adding your orange paint.

3. Paint the Inside Orange

Brush a thin coat of orange glass paint over the inside of each bowl. Allow it to dry, then add another thin coat if needed.

Turn the bowls occasionally to check the finish from the outside. The textured glass should remain the star of the project, with the orange showing through it.

A little variation in the colour adds handmade character. Avoid thick paint collecting in the patterned recesses, though, as it can dry unevenly.

Remove the tape as directed by the paint manufacturer.

4. Let the Paint Cure

Give the paint its full recommended curing time before handling and assembling the bowls.

For secondhand glass of unknown age or composition, choose a glass paint that cures without baking. Do not put unknown vintage glass or crystal in the oven.

5. Attach the Stem

Set the upper bowl upside down and glue a short twig or recycled cork to its exposed flat base.

Use an adhesive suitable for glass and your chosen stem material. Support the stem while it sets, then leave it for the full curing time.

A slightly crooked twig looks lovely here. Keep it short and lightweight, and remember to lift the finished bowl by the glass rather than by its decorative stem.

6. Make a Bow From Recycled Fabric

Tear or cut a narrow strip from an old cotton shirt, sheet or fabric scrap. Pull a few threads from the edges for a softly frayed finish, then tie it around the stem.

Faded checks, plain cotton and worn linen all work well. If you have leftover twine or a leaf from an old artificial flower arrangement, tuck that in too.

This is a good place to use what you already have. The worn fabric gives the pumpkin much of its rustic charm.

7. Put the Pumpkin Together

Place the lower bowl upright on a level surface, then carefully set the decorated upper bowl over it, rim to rim.

Leave the bowls separate so they’re easy to store. Tiny, evenly spaced felt pads can cushion the edges if needed, but they won’t hold the bowls together.

Choose a sturdy display spot where the pumpkin won’t be bumped.

Styling Your Recycled Pumpkins

A thrifted wooden tray, an old basket or a folded scrap of linen makes a lovely setting for these glass pumpkins. Try making a small collection in different sizes, using burnt orange, muted terracotta and golden orange for a softer autumn palette.

Keep the decorations simple enough that you can still see the glass patterns. A twig, a frayed bow and a few rescued leaves are plenty.

These pumpkins are decorative only. Don’t place food against the painted interiors or use candles or other heat sources inside. When the season is over, separate the bowls and wrap them in old fabric before storing them for next year.

Explore

books Christmas CraftGossip Giveaways Craft Inspirations Easter glass halloween Home Decor kid crafts More Crafts Patterns & Tutorials Recycled and Thrifted Ideas recycled art Recycled Clothing Recycled Jewelry Recycled kids crafts Recycled Sewing Recycling Ideas Recycling Organizing tin can

Featured Posts

Easy way to dress up shoes

Flowers, paper bags and a bit of lint make for some pretty magnets

Give books a new look with textiles and buttons

Turn Thrifted Tins into Festive Christmas Canisters – A Fun DIY Project

How to make recycled book page rosettes

RSS feed: More Articles More Articles

  • 10 Ice Cubes That Instantly Elevate Champagne
  • Setting Up a Beginner Craft Space? A Practical Shopping List
  • Thrift Store Upcycling: Rustic Pumpkin Decorations From Glass Bowls
  • Mini Pumpkins and Jack o’Lanterns to Cross Stitch
  • Beaded Halloween Skeleton Craft – A Spooky-Cute Bead Project For Halloween Decorating
  • Sweet Mini Halloween Knitting Patterns
  • Lightweight Lacy Crochet Tee Pattern That’s Perfect for Layering
  • 3 FREE Comfy Cozy Coloring Pages
  • DIY Halloween Bath Bombs – Spooky-Fun Self-Care for Ghouls of All Ages
  • Designer Spotlight: Threadbound Art

Copyright © 2026 · CraftGossip | Start Here | Contact Us | Link to Us | Your Editors | Privacy and affiliate policy