• Home
  • Suggest A Craft
  • DIY Newsletter

Recycled Crafts

Creative DIY Projects That Turn Trash Into Treasure

  • About CraftGossip
  • Our Network
    • Bath & Body Crafts
    • Candle Making Ideas
    • Crochet Ideas
    • Cross Stitch
    • Edible Crafts
    • Felting Patterns
    • Glass Art
    • Home & Garden Ideas
    • Indie Crafts
    • Jewelry Making
    • Kids Crafts
    • Knitting Patterns
    • Lesson Plans
    • Needlework
    • Party Ideas
    • Polymer Clay
    • Quilting Ideas
    • Recycled Crafts
    • Scrapbooking
    • Sewing Patterns
    • Card Making
    • DIY Weddings
    • Not Craft Ideas
  • Giveaways
  • Roundups
  • Store
  • Search

Book Review: Charming Woodland Crafts – A Nature-Inspired Treasure Trove for Eco-Friendly Creators

May 3, 2025 by Shellie Wilson

recycled nature crafts

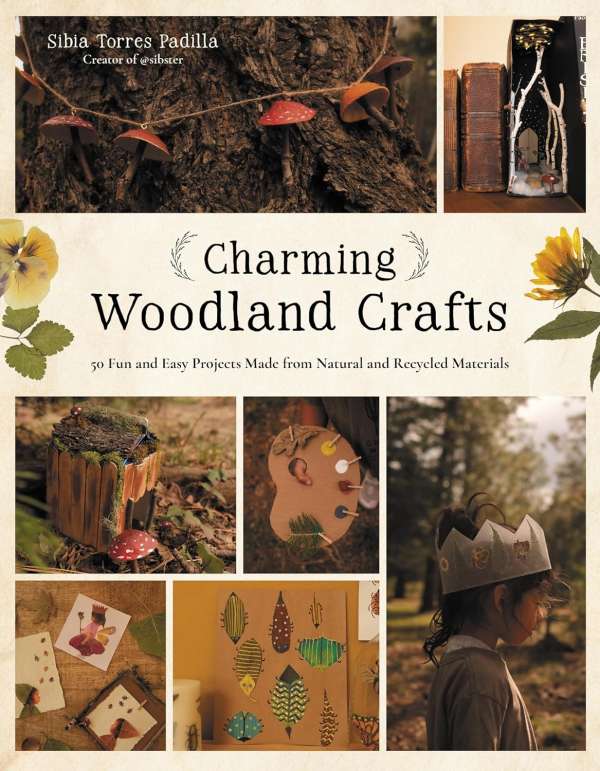
If you’re someone who loves turning natural and recycled materials into beautiful handmade crafts, then Charming Woodland Crafts is a book you’ll want on your shelf — or more accurately, on your craft table covered in bark, twigs, and acorns.

Written with heart and earthy inspiration, this book is a delightful collection of nature-inspired DIY projects that speak to the soul of every upcycler and eco-conscious crafter. From rustic woodland animals to whimsical fairy doors, each project captures the simple magic of the forest while encouraging sustainable crafting with recycled materials.

What I appreciated most is how approachable the projects are — you don’t need fancy equipment or costly supplies. Just step outside, gather some twigs, pinecones, and pebbles, and you’re halfway there. For those of us who love eco-friendly crafts, this book is a gentle nudge to get outdoors and use what nature already provides.

Perfect for crafting with kids, making thoughtful handmade gifts, or even decorating your home or garden with a rustic woodland aesthetic, this book ticks all the boxes. The photography is gorgeous and the instructions are clear, with just enough creative wiggle room to make each piece your own.

If you’re a fan of recycled craft ideas, zero-waste projects, or just want a new way to connect your crafting with the natural world, Charming Woodland Crafts is a lovely and inspiring resource. It fits right in with our blog’s mission to make beautiful things from what others might throw away.


 GIVEAWAY TIME!
Want to get your hands on a copy of this awesome book? Here’s your chance!

To enter, simply leave a comment below telling us why you’d love to win this book. That’s it! You’ll automatically go into the draw. ?

 Winners will be selected at random at the end of the month and contacted directly—so make sure you’re checking your messages!

 Open worldwide—but please note:

If you live on a remote island only accessible by canoe, shipping may take a little longer.

We can’t be held responsible for book-stealing seagulls or nosy postal workers.

One entry per person (our psychic cat will know if you cheat).

 So go ahead—tell us why you want this book and you might just be our lucky winner!

Related Posts:

  • Eco-Craft Fun: 25+ Sustainable Activities to Teach…
  • How to make recycled clothes pin puppets
«
»

Have you read?

DIY Kids Craft Project – Upcycled Cardboard Box Sandcastle

kids-upcycled-cardboard-sandcastle

Looking for a creative way to keep the kids entertained this summer without spending a fortune? Turn your trash into treasure with this fun Recycled Sandcastle Craft Project! Using cardboard boxes, plastic lids, glue, and a bit of imagination, kids can build their very own sandcastle kingdom – no beach required!


What You’ll Need:

  • Cardboard boxes (cereal, tissue, shipping boxes – any size)

  • Toilet paper rolls or paper towel tubes

  • Plastic lids (yogurt containers, jar tops, etc.)

  • Paper or plastic straws, twigs, or sticks

  • Scrap plastic, paper, or fabric for flags

  • Craft glue or a hot glue gun (with adult supervision)

  • Scissors

  • Sand or beige paint (optional for decoration)

  • Markers, stickers, or leftover craft supplies to decorate

Step-by-Step Instructions:

Step 1: Gather and Prep Your Recyclables

Head to your recycling bin and pull out clean items that could work as castle parts—boxes for walls, tubes for towers, and lids for turrets. Cut down the boxes into smaller sections if needed, and make sure everything is dry and ready to work with.

Step 2: Plan Your Castle Layout

Before gluing anything down, lay out your castle design on a flat surface. Decide where the towers, walls, and “gate” will go. You can make it symmetrical, or go wild with a quirky kingdom layout!

Step 3: Glue the Main Structure Together

Use craft glue (or hot glue if you’re working with older kids or want faster drying). Start attaching the boxes and tubes together to form the base of your sandcastle. Stack tubes on top of boxes to create turrets. Use plastic lids as domes or roof tops.

Step 4: Add Decorative Elements

This is where the fun begins! Use:

  • Bottle caps as windows or shields

  • Buttons as faux stones

  • Cutout shapes from scrap cardboard for castle doors or battlements (those square-topped castle walls!) Get creative with what you’ve got – there’s no wrong way to build your dream castle.

Step 5: Make and Add Flags

Cut small triangles or flags from scrap plastic, fabric, or colored paper. Tape or glue these to the tops of straws, sticks, or twigs. Then, glue them onto the tops of towers or castle corners. You can even personalize each flag with a coat of arms or your child’s initials!

Step 6: Add the “Sand” Effect (Optional)

For an authentic look, brush glue over the castle and sprinkle it with craft sand. No sand on hand? Use beige paint, or mix some flour with a pinch of cinnamon for a sandy texture.

Step 7: Let it Dry and Display!

Let everything dry completely—especially if you’ve used a lot of glue. Then proudly display your recycled sandcastle on a shelf, or use it as part of imaginative play time.

Bonus Ideas:

  • Build a whole sandcastle village and connect them with paper bridges.

  • Make tiny “people” out of clothespins or paper scraps.

  • Add fairy lights inside for a magical castle glow at night.

This project is a fantastic way to keep little hands busy and teach kids the value of reusing materials. Plus, it’s just plain fun! Whether you’re doing this at home, in a classroom, or at a summer camp, your recycled sandcastles are sure to be a hit.

Explore

books Christmas CraftGossip Giveaways Craft Inspirations Easter glass halloween Home Decor kid crafts mason jar More Crafts Patterns & Tutorials recycled art Recycled Clothing Recycled Jewelry Recycled Sewing Recycled Tutorials Recycling Ideas Recycling Organizing tin can

RSS More Articles

  • Designer Spotlight: Flossy Fox Shop
  • 6 FREE Summer Printable Journaling Cards
  • Bucket Hat Knitting Patterns
  • DIY Summer Nail Designs You’ll Want to Rock All Season Long
  • Varsity Scarf: The Perfect Gift for Sports Fans (or Fashion Lovers!)
  • Unlock the Secrets of Stunning Stitches: Why The Geometry of Hand-Sewing Will Transform Your Craft Forever
  • Summer Math Games for Kids
  • A Children’s Book About A Quilt Maker – Perfect Gift Idea
  • DIY Kids Craft Project – Upcycled Cardboard Box Sandcastle
  • How to Make a Taylor Swift Inspired Card

Pick Your Blog

  • Sewing
  • Knitting
  • Quilting
  • Crochet
  • Home & Garden
  • Recycled Crafts
  • Scrapbooking
  • Card Making
  • Polymer Clay
  • Cross-Stitch
  • Edible Crafts
  • Felting
  • Glass Art
  • Indie Crafts
  • Kids Crafts
  • Jewelry Making
  • Lesson Plans
  • Needlework
  • Bath & Body
  • Party Ideas
  • Candle Making
  • DIY Weddings
  • Not Craft
  • Free Craft Projects

Copyright © 2025 · CraftGossip | Start Here | Contact Us | Link to Us | Your Editors | Privacy and affiliate policy