• Home
  • Suggest A DIY
  • DIY Newsletter

Recycled Crafts

Creative DIY Projects That Turn Trash Into Treasure

  • About CraftGossip
  • Our Network
    • Bath & Body Crafts
    • Candle Making Ideas
    • Crochet Ideas
    • Cross Stitch
    • Edible Crafts
    • Felting Patterns
    • Glass Art
    • Home & Garden Ideas
    • Indie Crafts
    • Jewelry Making
    • Kids Crafts
    • Knitting Patterns
    • Lesson Plans
    • Needlework
    • Party Ideas
    • Polymer Clay
    • Quilting Ideas
    • Recycled Crafts
    • Scrapbooking
    • Sewing Patterns
    • Card Making
    • DIY Weddings
    • Not Craft Ideas
  • Giveaways
  • Roundups
  • Store
  • Search

Acorn capped pom poms

September 3, 2015 by Stefanie Girard

Acorn-Pom-Pom-Washi-Tape-Clothespin-Napkin-Clips I love all things acorn and this is such a fun idea! The clever crafters over at Club Chica Circle have come up with a cute way to combine acorn caps, pom poms and clothes pins to make napkin clips. These would also be great to hold name cards. Or virtually anywhere you would be using clothes pins you can embellish them in such a fun way.

Looking for more pom pom crafts? Check out these Pom Pom makers.
«
»

Have you read?

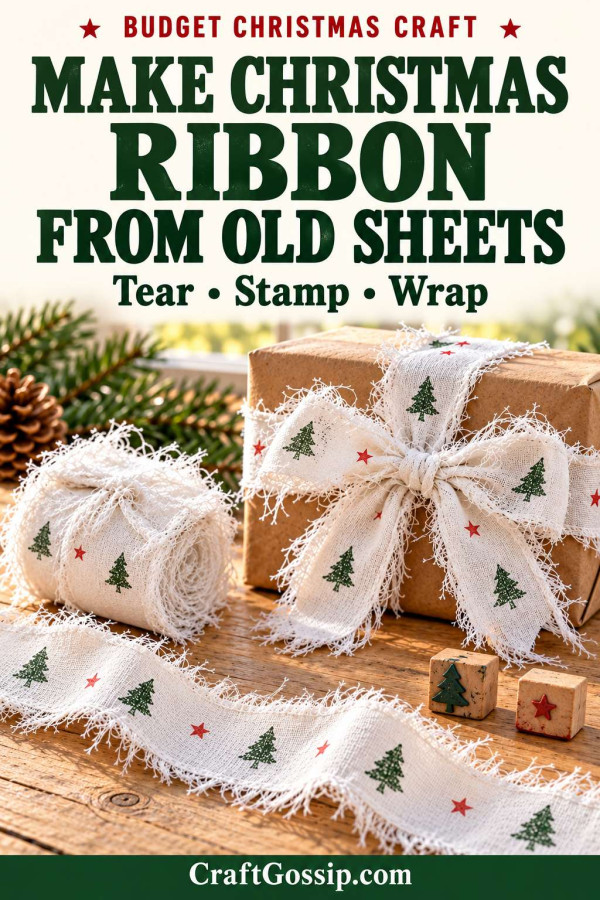
Make Rustic Christmas Ribbon from Old Bed Sheets and Tiny Stamps

Before you spend money on another roll of Christmas ribbon, check the linen cupboard. An old white cotton sheet can become a lovely batch of rustic gift ribbon with nothing more than scissors, a couple of little Christmas stamps and an ink pad.

This homemade Christmas ribbon has all the details I love: soft white fabric, wonderfully frayed edges and tiny stamped trees running along the centre. Tie it around plain brown paper and suddenly your budget wrapping looks rather special.

There’s no sewing involved, and because we’re making decorative ribbon that won’t be washed, there’s no need to buy specialist fabric ink or heat-set the designs. Start with the supplies you already have.

What You Need

  • An old, clean white cotton bed sheet
  • Fabric scissors
  • Ruler or measuring tape
  • Small Christmas stamps, such as trees, stars or snowflakes
  • An ordinary stamp pad in green, red or your preferred colour
  • Plain scrap paper to protect the table
  • An acrylic stamping block if using unmounted clear stamps
  • Scrap cardboard or a cardboard tube for storing your ribbon

Skill level: Beginner
Time: Around 30–45 minutes for a small batch, plus ink drying time

Keep Your Stamping Supplies Cheap

A simple tree design is perfect for this project. These Christmas tree stamp on Amazon are one option to look at, or use a little festive stamp already in your craft cupboard.

You can also look for inexpensive Christmas stamps at Dollar Tree or your local dollar shop when seasonal stock arrives. You only need a couple of designs, so there’s no need to buy a big coordinated set.

If you choose self-inking stamps, try them on a fabric scrap first. Keep an extra stamp pad handy if the impression is faint, provided the stamp’s design allows you to press its surface onto the pad.

One tree stamp and one extra green ink pad are enough to make a whole batch of pretty ribbon.

How to Make Rustic Stamped Christmas Ribbon

1. Choose Your Fabric

Use a clean white sheet made from plain woven cotton. The sound edges of a worn sheet are ideal, even when the middle has seen better days.

Cut away the hems, elastic and damaged areas. Avoid fabric that is so thin it tears apart with a gentle tug.

Smooth cotton gives small stamps a clearer impression than fluffy flannelette. Stretchy jersey bedding won’t give you the same torn, frayed finish.

Don’t worry about a few wrinkles. We’re aiming for soft, rustic ribbon with plenty of character.

2. Tear the Sheet into Wide Strips

Measure approximately 5 cm across from the edge and make a small snip with your scissors.

Hold the fabric firmly on either side of the snip and tear steadily along the grain. Test a short section first, as some sheets tear more neatly than others.

Continue making strips across your usable fabric. If the material won’t tear cleanly, cut your strips instead and fray the edges by hand.

Keep the lengths long for wrapping parcels. You can cut shorter pieces later once you know what you’re wrapping.

This torn-fabric technique also looks lovely in our primitive Christmas sack tutorial, which uses old flannel for a cosy festive finish.

3. Make the Edges Nicely Rustic

Use your fingers to loosen a few lengthwise threads along both sides of each strip. Gently pull them away to create a visible fringe.

For the wider, ragged look shown here, aim for roughly 5 mm of fraying on each side, leaving plenty of solid fabric through the centre.

Let some threads remain a little longer than others. Trim away any large tangles, but resist tidying every edge into perfect submission. Those uneven threads are part of the charm.

If the strip becomes badly twisted, smooth it out or give it a light press. It doesn’t need to be perfectly flat.

4. Try Your Stamps on an Offcut

Protect your table with plain scrap paper and place a fabric offcut on top.

Lightly ink your stamp, press straight down onto the fabric, then lift it straight up. Avoid rocking the stamp, which can blur the design or leave marks from its edges.

Check the result before stamping your long strips. If the ink spreads, try less ink and a lighter touch. If the design barely shows, re-ink and try again.

Small, simple shapes work best. A little solid tree will usually read more clearly than an elaborate design full of tiny details.

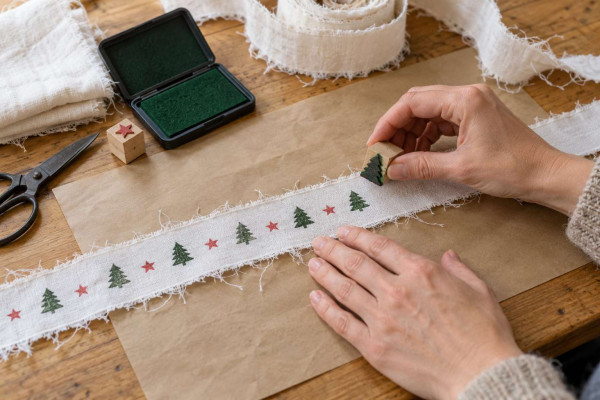
5. Stamp Along the Centre of the Ribbon

Lay one strip flat with its frayed edges spread out.

Stamp a little tree in the centre of the ribbon, then repeat along its length. Leave approximately 4–5 cm between the centres of each motif, adjusting the spacing to suit your stamp.

Keep the designs in a single row down the middle, with generous white space on either side.

You could use:

  • Green Christmas trees all the way along
  • Alternating green trees and red stars
  • Tiny red hearts for a simple Scandinavian look
  • Small snowflakes in a single colour

There’s no need to fill every gap. The little designs look especially lovely against plenty of plain white fabric.

Work along the strip in sections, keeping freshly stamped areas from folding onto each other. Move to clean protective paper if ink has passed through the cloth.

6. Leave the Ribbon to Dry

Leave your stamped ribbon flat until the ink is completely dry. Drying time will vary depending on the ink and how much you have applied.

Once dry, gently rub your test scrap against clean white paper to check for smudging or colour transfer before using the ribbon on a gift.

There’s no heat-setting step for this decorative project. Just choose an ordinary ink pad that gives a satisfactory result on your test scrap and keep the finished ribbon dry.

7. Wrap Your Gifts

Wrap your parcel in brown paper, bring the ribbon around it and tie a relaxed bow.

Adjust the loops and tails so a few stamped trees are visible. The wide white fabric and frayed edges do most of the decorating for you.

For smaller presents, a simple knot with two loose tails looks just as pretty and uses less ribbon.

Short pieces can finish gift tags, tie around gift bags or decorate the ends of our fabric Christmas crackers. Those open by untying the ends, so your ribbon can be saved afterwards.

Easy Ways to Make It Your Own

Keep it simple: Use one green tree stamp on every strip for a coordinated batch of wrapping.

Add a little colour: Alternate trees with red stars, leaving plenty of space between them.

Make matching tags: Stamp the same design onto plain card and attach it beneath the bow.

Add a handmade ornament: Tie one of our scrap fabric tree ornaments onto the parcel as a little extra gift.

A Little Christmas Saving That Adds Up

The best way to keep this project inexpensive is to use an unwanted sheet and the stamps you already own. If you need supplies, buy just one or two small stamps and a useful ink colour.

Measure around each parcel before cutting your ribbon, and save the short ends for tags and little packages. Once dry, wind spare lengths loosely around scrap cardboard so they’re ready for your next wrapping session.

You don’t need fancy ribbon to make a present feel thoughtful. Sometimes an old sheet, a little green tree stamp and a gloriously untidy fringe are quite enough.

Explore

books Christmas CraftGossip Giveaways Craft Inspirations Easter glass halloween Home Decor kid crafts More Crafts Patterns & Tutorials Recycled and Thrifted Ideas recycled art Recycled Clothing Recycled Jewelry Recycled kids crafts Recycled Sewing Recycling Ideas Recycling Organizing tin can

Featured Posts

How to make recycled tp tube unicorns

Fun collection of recycled wood projects, lots with wiggle eyes

Clicker words fit perfectly on clothes pins

How to make the cutest Mummy Halloween decoration

How to decorate a cup with rubber bands

RSS feed: More Articles More Articles

  • Hanukkah Cross Stitch Projects
  • Christmas on a Budget -Scrap Fabric Christmas Gift Bags You Can Use Every Year
  • 10 DIY Recycled Christmas Jewelry Ideas
  • The Miffy Crochet Book Review: 16 Sweet Projects for Bunny Lovers
  • Christmas on a Budget – How to Style Your Christmas Table Using Things You Already Own
  • Herbal Bath Soak for Muscle Relief Review
  • 10 Autumn Floral Cards
  • Knitting Machine Scarves with a Fun Twist
  • Gross Motor Math Ideas
  • 5 Things To Do With That Odd Leftover Jar Of Thumbtacks

Copyright © 2026 · CraftGossip | Start Here | Contact Us | Link to Us | Your Editors | Privacy and affiliate policy