• Home
  • Suggest A Craft
  • DIY Newsletter

Recycled Crafts

Creative DIY Projects That Turn Trash Into Treasure

  • About CraftGossip
  • Our Network
    • Bath & Body Crafts
    • Candle Making Ideas
    • Crochet Ideas
    • Cross Stitch
    • Edible Crafts
    • Felting Patterns
    • Glass Art
    • Home & Garden Ideas
    • Indie Crafts
    • Jewelry Making
    • Kids Crafts
    • Knitting Patterns
    • Lesson Plans
    • Needlework
    • Party Ideas
    • Polymer Clay
    • Quilting Ideas
    • Recycled Crafts
    • Scrapbooking
    • Sewing Patterns
    • Card Making
    • DIY Weddings
    • Not Craft Ideas
  • Giveaways
  • Roundups
  • Store
  • Search

A bunch of cute ways to display teddy bears

January 5, 2015 by Stefanie Girard

teddy bear art, display teddy bear

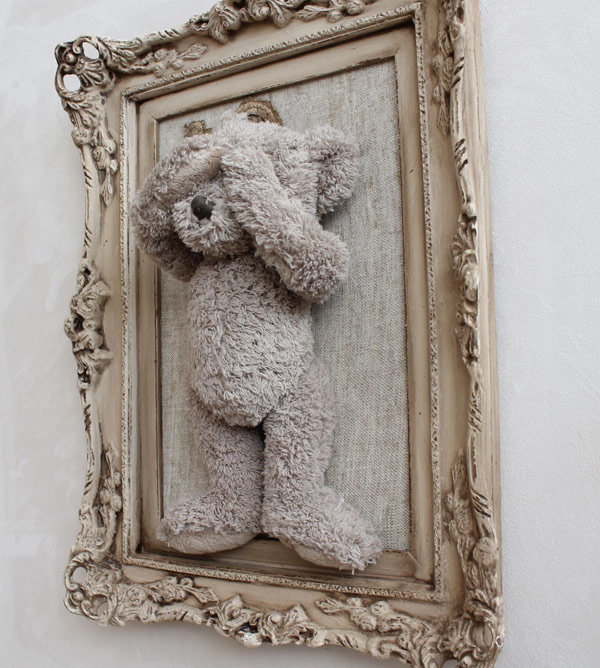
Peek-a-boo! This is just too cute! I know I say that a lot but you really can’t argue with this cuteness. And there are a bunch more cute ideas on how to frame vintage teddy bears in cute ways over at the blog Constance Zahn. I bet these ideas would work with any stuffed animal especially those old super loved and worn out ones.

Do you have a favorite teddy bear from your childhood that you just can’t bear to part with? I know I do! I have this old, well-loved teddy bear that I’ve had since I was a little girl and it holds so many special memories. I was always on the lookout for a special way to display him and keep him close, when I stumbled upon the blog Constance Zahn.

So, if you’re like me and have a special teddy bear that you just can’t bear to part with, then be sure to check out the blog Constance Zahn for all the inspiration you need. It’s time to give your favorite stuffed animal the special place it deserves in your home decor!

Related Posts:

  • 35 Rolled Magazine Crafts -You’ll Never Throw Away a…
  • Upcycled Keyboard Key Crafts: 20+ Clever Ways to…
«
»

Comments

  1. Pamela Jackson says

    January 7, 2015 at 3:17 pm

    I have a teddy that I brought home from Herrords and have been thinking how to display him…this idea is PERFECT !!!!!

  2. Myrna Goff says

    March 7, 2015 at 11:22 am

    On the Blog you listed that has the teddy bears, is there any way to convert that to English. I’ve searched the site and I don’t see any specific link to click. TY

  3. Stefanie Girard says

    March 7, 2015 at 1:22 pm

    Try google translator

  4. awillandadiyway says

    April 22, 2016 at 8:09 pm

    This is the cutest…have an old lamb I’ve had since I was a baby… gotta do this

Have you read?

DIY Mason Jar Lid Sunflowers with Rustic Stems – Upcycled Farmhouse Decor

If you love sunflowers but wish they could last longer than a week in a vase, I have just the project for you. With a handful of thrifted mason jar lids, a little paint, and a dash of creativity, you can make your own DIY Mason Jar Lid Sunflowers with rustic stems — the kind that brighten your home all year long.

This project blends farmhouse charm with eco-friendly upcycling, making it perfect for crafters who love to give old materials a new life. Whether you display them in a vase, turn them into a wreath, or pop them into potted plants, these handmade sunflowers bring sunshine into any space.

Why You’ll Love This Sunflower Craft

  • Budget-friendly: Most supplies can be thrifted, recycled, or found at home. 
  • Customisable: Change the petal colour, stem style, or centre texture to suit your décor. 
  • Durable décor: Unlike fresh flowers, these won’t wilt or fade. 
  • Eco-conscious: A clever way to upcycle mason jar lids and scrap fabric. 

Supplies You’ll Need

To make your own mason jar lid sunflowers, gather these simple materials:

  • Mason jar rings (any size – thrifted or recycled) 
  • Yellow spray paint or acrylic craft paint 
  • Brown felt, burlap, or textured fabric for the flower centres 
  • Hot glue gun and glue sticks 
  • Wooden dowels, sticks, or recycled chopsticks for stems 
  • Green floral tape or green craft paint 
  • Optional: raffia, ribbon, faux greenery, grapevine wreath form 

Step-by-Step: How to Make DIY Mason Jar Lid Sunflowers with Rustic Stems

Step 1: Prep Your Mason Jar Lids

Wash and dry the lids thoroughly. If they have rust spots, give them a quick sanding for a smooth surface. This will help your paint adhere better.

Step 2: Paint the Petals

Lay out your lids on newspaper or cardboard. Spray paint them in a bright sunflower yellow. Two light coats give the best coverage.
Tip: For a more natural, layered look, dry-brush with mustard or orange tones after the base coat dries.

Step 3: Create the Sunflower Centre

Cut a circle of brown felt, burlap, or textured fabric slightly larger than the inner opening of the lid.
For extra detail, glue on small black buttons, beads, or seeds for a realistic sunflower centre.

Step 4: Assemble the Flower

Flip the lid over and hot glue the centre fabric to the back so it fills the ring’s opening.
Press firmly to make sure it’s secure — especially if you’re making these for a wreath or outdoor display.

Step 5: Add the Stem

Glue a wooden dowel, twig, or recycled chopstick to the back of the lid.
Wrap the stem in green floral tape for a smooth, finished look — or leave a twig unwrapped for a more rustic, natural style.

Step 6: Add Finishing Touches

Tie a bow of raffia or ribbon around the stem. Glue on a couple of faux leaves for extra charm.
If you’re making a bouquet, vary the stem lengths for a more natural arrangement.

Creative Ways to Use Your Mason Jar Lid Sunflowers

  • Rustic Vase Display: Arrange several sunflowers in a ceramic jug or glass mason jar. 
  • Farmhouse Wreath: Glue the flowers to a grapevine wreath form and hang on your front door. 
  • Garden Accents: Seal with an outdoor spray and stake in flower beds or planters. 
  • Gift Toppers: Make mini sunflowers for wrapping embellishments or party favours. 

 Tips for the Best Results

  • Use different jar ring sizes for varied petal shapes in your bouquet. 
  • Dry-brush the petal edges with orange paint for added depth and realism. 
  • Mix in a few “wild” stems with curled raffia or greenery for a fuller, more natural look. 

The Beauty of Upcycling

This DIY mason jar lid sunflower craft is proof that everyday items — even something as humble as a jar lid — can become something extraordinary.
It’s not just about making something pretty; it’s about crafting something with a story, saving materials from the bin, and adding a burst of joy to your home.

So next time you spot a box of old jar lids at a thrift store, don’t pass them by. Pick them up and turn them into sunshine that never fades.


Explore

books Christmas CraftGossip Giveaways Craft Inspirations Easter glass halloween Home Decor kid crafts More Crafts Patterns & Tutorials recycled art Recycled Clothing Recycled Jewelry Recycled kids crafts Recycled Sewing Recycled Tutorials Recycling Ideas Recycling Organizing tin can

RSS More Articles

  • Build a Paper City with Free Printables
  • Crochet Pattern Review: Pullover Crochet Pattern by Lion Brand
  • How to Make Textured Wall Art: Easy DIY Canvas Art
  • DIY Mason Jar Lid Sunflowers with Rustic Stems – Upcycled Farmhouse Decor
  • 8 FREE Printable Thank You Teacher Cards
  • Pencil Bookmark Cross Stitch Pattern
  • Book Review: No Fear Sock Knitting
  • Your “Sustainable Fabric” Isn’t as Eco-Friendly as You Think
  • Book Review: Punch Needle Rug Hooking Handbook
  • 12 Back to School Scrapbook Layout Ideas

Copyright © 2025 · CraftGossip | Start Here | Contact Us | Link to Us | Your Editors | Privacy and affiliate policy