• Home
  • Suggest A Craft
  • DIY Newsletter

Recycled Crafts

Creative DIY Projects That Turn Trash Into Treasure

  • About CraftGossip
  • Our Network
    • Bath & Body Crafts
    • Candle Making Ideas
    • Crochet Ideas
    • Cross Stitch
    • Edible Crafts
    • Felting Patterns
    • Glass Art
    • Home & Garden Ideas
    • Indie Crafts
    • Jewelry Making
    • Kids Crafts
    • Knitting Patterns
    • Lesson Plans
    • Needlework
    • Party Ideas
    • Polymer Clay
    • Quilting Ideas
    • Recycled Crafts
    • Scrapbooking
    • Sewing Patterns
    • Card Making
    • DIY Weddings
    • Not Craft Ideas
  • Giveaways
  • Roundups
  • Store
  • Search

7 Pallet Projects For Your Outdoor Space

April 22, 2014 by Larissa Coleman

Recycling and repurposing pallets has become a popular trend for DIY enthusiasts and homeowners alike. These versatile wooden crates are often easy to come by and can be transformed into a variety of unique and functional items. From furniture to planters, the possibilities are endless when it comes to repurposing pallets.

If you have a stash of pallets or are willing to put in the effort to find them, we’ve gathered 7 outdoor projects that will help you make the most of your pallet collection. These projects are not only practical and functional, but they’ll also add a touch of rustic charm to your outdoor space.

One of the most popular ways to repurpose pallets is to turn them into outdoor furniture. From coffee tables to Adirondack chairs, there are many creative ways to use pallets to create comfortable and stylish outdoor seating areas.

Pallets can also be transformed into unique and creative planters. By adding a few extra pieces of wood or a bit of hardware, you can turn a simple pallet into a vertical garden that is both practical and stylish.

For those in need of some extra storage, pallets can be used to create charming and rustic outdoor shelving. By attaching brackets and shelves, old pallets can become a creative and functional storage solution.

If you’re looking for a unique way to add a bit of privacy to your outdoor space, pallets can be used to create charming and rustic fences. By stacking and securing pallets together, you can create a fence that is both practical and stylish.

Pallets can also be used to create creative and functional outdoor bars. By attaching shelves and brackets, you can transform an old pallet into a charming and rustic bar area that is perfect for entertaining.

For those who love to garden, pallets can be used to create charming and rustic raised garden beds. By securing pallets together and adding soil, you can create a unique and functional garden that is both practical and stylish.

So whether you have a stash of pallets or are willing to put in the effort to find them, these 7 outdoor projects are sure to inspire you. From furniture to planters, the possibilities are endless when it comes to repurposing pallets.

Looking for more Pallet Crafts? Check out these Pallet Project books.

verticle

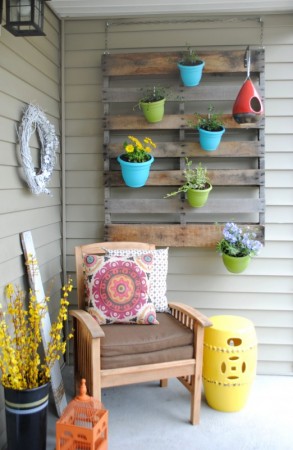
1- Vertical Pallet Garden from SAS Interiors

ShippingPalletCoffeeTable3

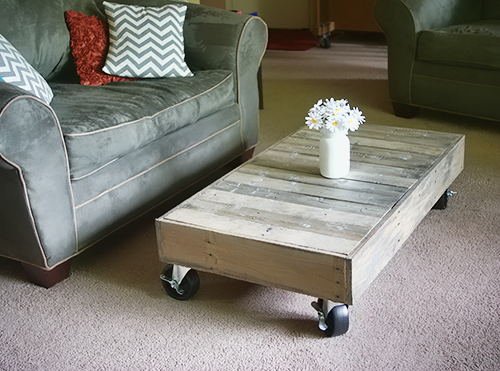
2- Shipping Pallet to Coffee Table from Saved by Love Creations

planterbox

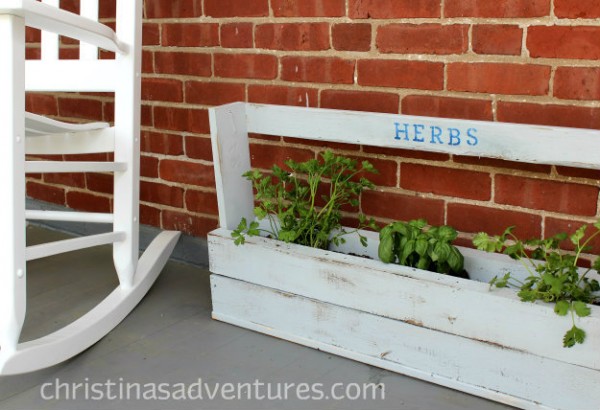
3- DIY Planter Box from Christina’s Adventures

sofa

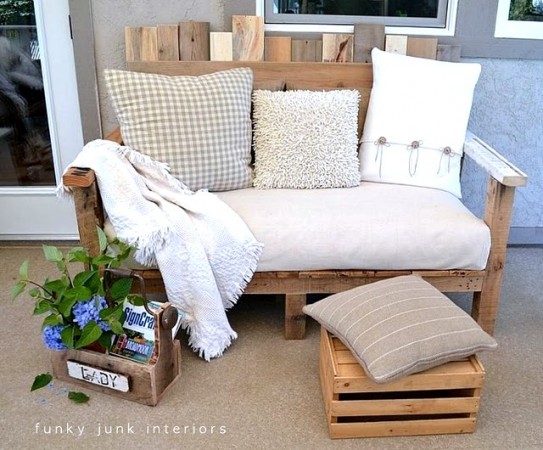
4- Pallet Wood Sofa from Funky Junk Interiors

outdoorswing

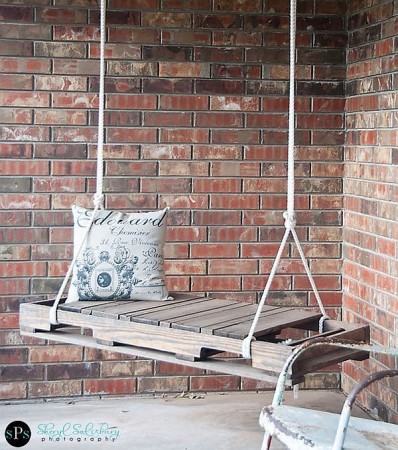
5- Pallet Swing from Sheryl Salisbury Photography

7red

6- Pallet Loungers from Shoe String Pavilion

Pallet Potting Table

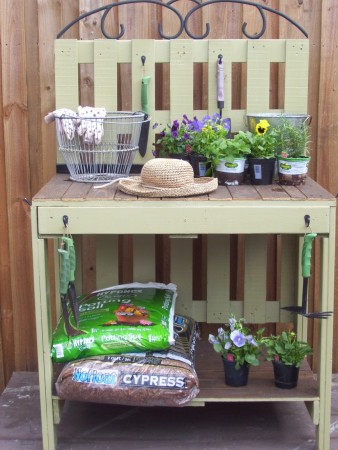
7- Pallet Potting Table from Rustic Rediscovered


Related Posts:

  • Creative Ways to Teach Kids About Recycling
  • Upcycling or Hoarding? Why Your DIY Projects Could…
«
»

Comments

  1. Christina @ Christina's Adventures says

    April 22, 2014 at 9:21 pm

    THANKS so much for including my pallet planter!! 🙂

  2. Becky PS says

    April 25, 2014 at 2:23 pm

    Such great ideas! Thanks!

Have you read?

How To Make A Milk Carton Village – A Recycled Craft for Kids

Ready to turn your recycling bin into a colorful, miniature village? Grab those empty milk cartons and let’s create a town filled with tiny houses, shops, and even a school or bakery! This craft is perfect for kids of all ages and encourages imagination, storytelling, and eco-friendly creativity.

 What You’ll Need:

  • Empty milk or juice cartons (washed and dried)

  • Paints or markers

  • Paintbrushes

  • Craft glue or glue stick

  • Scissors (adult supervision recommended)

  • Colored paper or old magazines

  • Bottle caps, buttons, or plastic lids (for windows or decorations)

  • Sticks, straws, or skewers (for flag poles or chimneys)

  • Optional: glitter, stickers, washi tape, cotton balls (for snow or clouds!)

 Step-by-Step Instructions:

Step 1: Clean and Prep the Cartons
Make sure your milk or juice cartons are washed and completely dry. Remove any plastic lids or caps and keep them for decorations!

Step 2: Plan Your Village
Decide how many buildings you want to make. Each milk carton becomes a house, shop, or whatever your imagination dreams up. Arrange them side by side or in a circle like a real village square.

Step 3: Cut Out Doors and Windows
With the help of an adult, carefully cut small door and window shapes into your cartons. You can also glue cut-out shapes from colored paper if you’d rather not cut into the carton.

Step 4: Paint and Decorate
Use paint or markers to bring your buildings to life. Make brick patterns, colorful siding, or roof tiles. Let each child choose their own theme – rainbow bakery, monster house, fairy home, or tiny fire station!

Step 5: Add the Roofs
You can paint the top pointy part of the carton like a roof, or glue on cardboard triangles to create overhangs. Want to add a chimney? Glue a straw or cardboard roll on top!

Step 6: Make Flags and Signs
Cut small flags from recycled plastic or paper and tape them to straws or sticks. Glue your flags to the rooftops. You can even create tiny signs for each building – “Toy Store,” “Library,” or “Super Cat’s House.”

Step 7: Build Your Village
Place all the finished buildings together on a large piece of cardboard, tray, or table. Use bottle caps for stepping stones, cotton balls for bushes or clouds, and draw roads with marker.

Step 8: Play!
Now that your village is built, use little toys, action figures, or LEGO people to live in your new town. Create stories and adventures—your Milk Carton Village is officially open!

 Learning Bonus:

This craft is not just fun—it also teaches recycling, fine motor skills, creative thinking, and storytelling. Plus, it’s a great group activity for playdates, classrooms, or family craft nights.

Let your kids’ imaginations run wild—and remember, no two villages need to look the same. Each one tells its own story!

Explore

books Christmas CraftGossip Giveaways Craft Inspirations Easter glass halloween Home Decor kid crafts More Crafts Patterns & Tutorials recycled art Recycled Clothing Recycled Jewelry Recycled kids crafts Recycled Sewing Recycled Tutorials Recycling Ideas Recycling Organizing tin can

RSS More Articles

  • Etsy Spotlight – The Thomas Boys Shirt Sewing Pattern
  • 7 FREE Back to School SVG Cut Files
  • Cozy Toes Await: Cable Crochet Slipper Boots Botties Wool Insoles Kit
  • How to Make a Sticks and Stones Quilt – Free Quilting Tutorial
  • Printable Cross Stitch Sheets Make it Easy to Cross Stitch on Clothes
  • Layered Embroidery on Watercolor Fabric: Mixed Media Magic
  • Paf – Panda Dad Free Crochet Pattern
  • How To Use Bath Salts in the Shower Without a Bath – Relaxation, Skincare, and a DIY Salt Recipe
  • How to Make Two Labubu Greeting Cards
  • DIY Fabric Twine Plant Hanger: A Stylish Way to Display Your Plants

Copyright © 2025 · CraftGossip | Start Here | Contact Us | Link to Us | Your Editors | Privacy and affiliate policy